With pandemic restrictions sufficiently relaxed to permit overseas travel without fear of being turned away at the border, MoMI decided to revisit a favourite museum last seen in 2009: the Tank Museum in Bovington, Dorset, UK.
From the nearby city of Poole, on the southern coast of England, the journey to the museum involved a South Western Railway train from Poole to the village of Wool, followed by a 2.9 kilometre walk from the Wool train station to the Tank Museum, located on the grounds of Camp Bovington, a British Army base. The museum houses the world's largest collection of tanks, with nearly 300 vehicles on display from 26 countries, and spans the full history of the tank, from its origins in the First World War right up to models still in use today.
Camp Bovington's origins lie in the British War Office's February 1889 purchase of 1,000 acres of land in Dorset for military use. By the beginning of the First World War, the camp had a few permanent buildings but soldiers were still required to sleep in tents. Although at first used to train soldiers recruited into the 17th Infantry Division, Camp Bovington was chosen in 1916 as the new Tank Training Centre for the troops of what was called the 'Heavy Section' of the Machine Gun Corps. Schoolrooms, accommodation buildings, and workshops were built at Bovington, as was an extensive trench system to permit trainee tank crews to practice assaulting battlefield obstacles. Given the secrecy of the newly-designed tank, local residents were reportedly told to stay indoors, draw their curtains, and face the wall when tanks were offloaded at the nearby Wool train station for onward movement to Camp Bovington. The first tank trainees arrived at Bovington in November 1916 and, by the end of 1917, the Tank Corps had been created and expanded, with over 300 tanks based at Bovington.
Following the Armistice of 11 November 1918, the British Army was drastically reduced in size and the Tank Corps was at risk of being disbanded. In 1922, it was agreed that four battalions would remain as a separate tank unit within the Army and the next year the War Office made a major investment in Camp Bovington, purchasing more land and establishing permanent housing for military families. It was author Rudyard Kipling who, during a visit to Bovington, saw tanks left over from the war sitting around the base and recommended the creation of a tank museum to preserve some of them. A shed was provided for this purpose and the first iteration of the Tank Museum was created. Also in 1923, the Tank Corps was given a Royal Warrant, being renamed the Royal Tank Corps. Throughout the 1920s and 1930s, Camp Bovington continued to train tank crews, with the facilities being updated rather than expanded. Although the Great Depression slowed the mechanisation of the British Army, growing fears of a war in continental Europe in the late 1930s accelerated the transition of horse-mounted cavalry units to armoured vehicles, with all units serving in armoured vehicles being grouped under the newly-formed Royal Armoured Corps in 1939.
When war broke out in September 1939, Camp Bovington found itself at risk from German air raids and a possible invasion of Britain from the sea. While training continued at the site, mobile columns were established to respond to any attacks from the sea or air and some of the old tanks housed in the Tank Museum were pulled from the collection to serve as static defences. Following the loss of the British Army's heavy equipment during the withdrawal from Dunkirk in May-June 1940, large numbers of tanks were ordered from American manufacturers through the Lend Lease scheme and the facilities at Camp Bovington were tripled in size to facilitate training on the influx of new American tanks. In the months leading up to the Allies' 6 June 1944 landings in Normandy, Camp Bovington had a prominent role in training tank crews as it had the facilities and instructors required, as well as the ability to produce training diagrams and pamphlets on all armoured vehicles. Additionally, the nearby Studland Bay closely resembled the geography of the Normandy beaches and was thus useful for training crews. By the time of the surrender of Germany on 8 May 1945, Camp Bovington was practically deserted and the British Army once more underwent a major demobilisation.
Following the end of the Second World War, armoured training continued at Camp Bovington, with considerable growth in the facilities for military personnel and their families. The Camp was also renamed The Royal Armoured Corps Centre during this period. However, the end of National Service conscription in 1960 drastically reduced the training infrastructure required and the size of the British Army has declined over the decades while compensating through the adoption of high quality training and technology. Today, Camp Bovington continues to be the British Army's centre for armoured vehicle training and is also responsible for developing tactics, strategies, and techniques to be used in future conflicts involving armoured forces.
Despite spending 6.5 hours inside the museum, from doors open at 10:00 to shortly before closing, certain sacrifices had to be made to permit sufficient time to see the full collection. As such, the following photo tour does not include the museum's Vehicle Conservation Centre or the live tank demonstrations on the outdoor track.
Enjoy this virtual tour of the Tank Museum and its impressive collection. And be sure to check out the photos of the museum's crown jewel, Tiger 131, the world's only operating German Tiger I tank.
Below: The Tank Museum brochure provided to visitors.
Photos taken on Monday, 2 May 2022
 |
| A sign on the Tout Hill road en route to the Tank Museum serves as a reminder that the area is still home to British Army tank training. |
 |
| The main entrance to the Tank Museum off Bovington Lane features a retired British Army Challenger 2 main battle tank as a gate guard. |
 |
| The FV4034 Challenger 2 was a major redesign of the earlier Challenger 1, with the British Ministry of Defence ordering a first batch of 140 Challenger 2s in 1991. The Challenger 2 entered British Army service in 1998, with deliveries continuing until 2002. The British Army operates 227 Challenger 2 tanks, with the Royal Army of Oman operating another 38. The tank has a crew of four and is armed with a L30A1 120mm (4.7 inch) rifled gun, with onboard stowage for 49 rounds of High Explosive Squash Head (HESH) or Armour Piercing Fin-Stabilised Discarding Sabot (APFSDS) ammunition. Its Perkins V12 diesel engine drives the Challenger 2 at a top speed of 59 km/h (37 mph) on-road or 40 km/h (25 mph) off-road. |
 |
| An FV4201 Chieftain Mark 5 main battle tank on display next to the Tank Museum building. The Chieftain was the British Army's main battle tank from 1966 to the late 1980s. Sacrificing agility for increased firepower and armour protection, the Chieftain was considered by some to be the most formidable main battle tank of its day. The Chieftain Mark 5 displayed here is fitted with a Pearson Engineering Track Width Mineplough, designed to dig landmines up and away from the tank's path. Armed with a 120mm L11A5 rifled gun, the 55-ton Chieftain Mk 5 had a crew of four, a range of 500 kilometres (310 miles), and a top speed of 43 km/h (27 mph) on-road and 30 km/h (19 mph) off-road. |
 |
| An FV603 Saracen Mark 5 six-wheeled armoured personnel carrier, manufactured by the Alvis Car and Engineering Company between 1952 and 1976. This 11-ton vehicle was protected by 16mm of Rolled Homogenous Armour and armed with a Browning M1919 machine gun or L37 7.62mm General Purpose Machine Gun. The Saracen had a crew of two and capacity for an additional nine troops. Its Rolls-Royce B80 engine gave the Saracen a top speed of 72 km/h (44 mph) on-road and 32 km/h (20 mph) off-road. This particular Saracen was originally built as a Mark 2 model in 1956 and ended its operational service in 1986 as a Mark 5 (Mark 1 or 2 with additional armour). |
 |
| The Saracen armoured personnel carrier was used by British forces during the Malayan Emergency (1948-1960) and later for policing duties in Northern Ireland (1968-1998). Eighteen other nations purchased Saracens for their military forces, with the vehicle seeing service in conflicts in Aden, Nigeria, Sri Lanka, Israel, and Lebanon. A notable operator of Saracens was South Africa, which ordered 280 vehicles between 1953 and 1956 and used them to enforce the country's apartheid policy. |
 |
| The Tank Museum, as seen from the car park out front. |
 |
| An American M24 Chaffee light tank parked outside the Tank Museum. 'Chaffee' was the name given to the M24 in British service, and the 20.3-ton tank was used in the latter stages of the Second World War, as well as the Korean War and conflicts in Indochina, Spanish West Africa, Vietnam, Cambodia, Laos, Algeria, India/Pakistan, and Iran/Iraq. Armed with a 75mm gun with 48 rounds and protected by 10-38mm of armour, the Chaffee was powered by a Cadillac engine to a top speed of 56 km/h (35 mph). Between April 1944 and August 1945, 4,731 M24s were built by the Cadillac and Massey-Harris companies. |
 |
| The main entrance to the Tank Museum at Bovington. Information panels in the picnic area next to the outdoor vehicle demonstration track tell the story of Camp Bovington over the decades from its establishment as the British Army's tank training centre in 1916 to the present day. |
 |
| One of the original prototypes of the FV4030/4 Challenger 1 main battle tank. This tank was used early in the Challenger development programme to test an experimental Hydrogas Suspension system as a replacement for spring suspension systems. The Challenger 1 was used by the British Army between 1983 and 2001 and is still in service (with modifications and upgrades) by the Royal Jordanian Army. Originally developed for the Imperial Iranian Army, the fall of the Shah in 1979 led to the tank being renamed 'Challenger' and ordered by the British Army to replace its Chieftain main battle tanks. The 62-ton Challenger 1 had a crew of four, was armed with a 120mm L11A5 rifled gun, and protected by Chobham composite armour. Its top speed was 56 km/h (35mph) on-road, with an on-road range of 450 kilometres (280 miles). The British Army operated 420 Challenger 1s, with Jordan operating 392 of the vehicles. British Challenger 1s saw service in the 1991 Gulf War, Bosnia and Herzegovina, and Kosovo. The Challenger I was superseded in the British Army by the Challenger 2, which began entering service in 1998. |
 |
| Visitors to the Tank Museum begin with this display on the 'design trio' of tanks: firepower, protection, and mobility. Tank designers needed to carefully weigh and prioritise each of these factors: heavy armour and armament offers better protection and lethality but comes at the sacrifice of the tank's mobility, whereas increased mobility will require trade-offs in the tank's weight of armour and/or armament. In the centre of the display is a Second World War 2-pounder gun mounted in an armoured mantlet and used to train tank gunners; it is a close copy of the same gun that would have been fitted to a Valentine Mark III or V. |
 |
| A Rolls-Royce Meteor Mark III tank engine originally fitted to a late production Cromwell tank. Developed in the 1940s from Rolls-Royce's Meteor aircraft engine used in the Royal Air Force's Spitfire and Hurricane fighters, the Meteor was used to power British tanks for approximately 50 years. |
First World War Gallery
 |
| Visitors pass through a recreation of a trench on the Western Front. It was the stalemate of static, bloody trench warfare which led British designers to develop the tank as a means of breaking through the deadlock to secure victory. |
 |
| A British communications post in a First World War trench, complete with a rat sitting atop an overturned pot in the lower right. |
 |
| A German underground accommodation bunker, with a framed photo of Kaiser Wilhelm II on the wall. |
 |
| A German machine gun post protected by a bramble of barbed wire. The soldiers are manning an MG 08, the German Army's standard machine gun of the First World War, and are wearing gas masks. |
 |
| A Mark I (Male) tank, the first fighting tank. This is the only remaining Mark I (Male) tank anywhere in the world. Little is known about its service during the First World War, but in the 1920s it was one of hundreds of derelict tanks sitting on Bovington Heath and was sent to Hatfield House in Hertfordshire to represent the very first tank, 'Mother', trialled there in 1916. The Mark I tank came in 'Male' and 'Female' versions, with the Male tanks carrying two side-mounted 6-pounder guns in sponsons and the Female tanks being armed with four sponson-mounted heavy machine guns. A total of 150 Mark I tanks were built, comprising 75 Males and 75 Females. The Male tanks tackled fixed defences, such as machine gun posts, while the Females were used to attack enemy infantry on the battlefield. |
 |
| A rear view of the Mark 1 (Male) tank, with British infantrymen seeking protection behind the lumbering machine as they advance. The large rear wheels assisted with steering the tank, and an anti-grenade structure is fitted to the tank's roof. The 28-ton Mark 1 tank had a crew of eight and armour protection of 11.9mm (0.47 inches) thickness. It was powered by a 105-horsepower Daimler petrol engine, giving the tank a top speed of 6 km/h (3.7 mph). The eight crewmen inside the tank suffered a rough ride from a lack of suspension, as well as stifling heat, deafening engine noise, engine exhaust fumes, and the molten fragments ('splash') of enemy bullets that penetrated gaps in the tank's armour. Moreover, as the fuel tank was located inside the crew compartment, if it was hit and ignited, the crew would burn to death. The Mark Is were built by William Foster & Company and by Metropolitan and were in service in 1916-17. |
 |
| A 21cm Mörser 10 German heavy howitzer captured by British forces during the First World War and donated to the Irish town of Brookeborough in County Fermanagh, the hometown of Captain Richard Annesley West of the 6th Battalion of the Tank Corps. West was one of 627 men awarded the Victoria Cross during the First World War. The Mörser 10 could fire a shell weighing 120 kilograms (264.5 lbs) to a distance of over 10 kilometres (6 miles). Although most communities received smaller and lighter field guns as monuments, it is believed that this heavy gun was presented to Brookeborough, despite the Irish civil war which broke out after the end of the First World War, because ammunition for it was unobtainable and, therefore, there was no risk of the gun being stolen and used in the civil war. |
 |
| A grapnel towed by tanks to clear coils of barbed wire from the battlefield and permit the passage of attacking infantrymen. The tanks first drove over the barbed wire to crush it and then towed these grapnels on a ten-metre cable to hook the wire and tear it from the ground. Such grapnels were first used during the Battle of Cambrai in November 1917, but this grapnel is an improved model, likely from 1918, following tests carried out by the Tank Corps at Dollis Hill in London. |
 |
| A Mark IV (Male) tank. The Mark IV entered service in May 1917 and was the most numerous British tank of the First World War, with over 1,200 being built. The type was first used at the Battle of Messines Ridge (7-14 June 1917) and saw action right to the end of the war, including the large battles of 1917-18. The 28-ton tank was built by the firms of William Foster & Company and Metropolitan and was powered by a 105-horsepower Daimler petrol engine that provided a top speed of 5.9 km/h (3.7 mph). |
 |
| A view of the rear left of the Mark IV (Male) tank. A crew of eight men operated the Mark IV, which was armed with two 6-pounder guns and four Lewis .303-inch machine guns, and protected by 11.9mm (0.47 inches) of armour. The large bundle of sticks on top of the tank is a fascine, a trench-crossing innovation. The tank would drive up to the trench, drop the fascine into the gap and then drive over it to the other side. Each fascine was made by bundling together 90-100 smaller bundles of sticks using chains pulled by two tanks driving in opposite directions to create a tightly-bound bundle measuring 1.4 metres (4.5 feet) in diameter. Fascines were usually produced by men of the Chinese Labour Corps, working in large numbers at the Tank Corps Central Workshops. The work was dangerous, as a tightening chain could kill anyone nearby if it snapped. |
 |
| A Matchless Vickers 8B2/M motorcyle machine gun combination. The motorcycle was built by H. Collier & Sons in Plumstead, South East London and the sidecar was designed by Vickers Ltd to accommodate a .303-inch water-cooled machine gun. The legs of the gun's tripod mounting were designed to lock into the floorboard of the sidecar so that the gun could be fired while on the move. Such motorcycles equipped the British Army's Machine Gun Corps (Motors), though they were found to be of little use in trench warfare. The 700 men of this unit were subsequently absorbed by the nascent Tank Corps while still under training, meaning that many of the first tank crews came from the Machine Gun Corps. The Matchless motorcycles were never used by the British Army, with this unit being ordered by Russia but never delivered due to the outbreak of the Russian Revolution in 1917 and the cancellation of the deal. |
 |
| A German 77mm (3 inch) Feldkanone 96 N/A, originally designed in 1896 with a range of 5,500 metres. Pressed into service as an anti-tank weapon by the German Army following its first encounters with British tanks, the 77mm Feldkanone was either dug into position to fire over the top of German trenches if supporting an attack, or it was dragged out of its emplacement so that the four-man team of gunners could swivel it to target attacking tanks. This gun was captured by Lieutenant A.G. Baker of the 7th Battalion Tank Corps in his tank Gorgonzola II during an attack near the village of Graincourt during the Battle of Cambrai on 20 November 1917. Baker knocked out the gun, hitched it to the back of his tank, and drove it back to British lines as a trophy of war. In 1938, the gun was gifted to the newly-formed British Army's 7th Tank Battalion as a ceremonial relic. |
 |
| A mannequin of Elliot Hotblack, the British Army Tank Corps' first Intelligence Officer. The eldest son of a Norwich brewing family, Hotblack's foreign language skills made him an ideal candidate for the Army's Intelligence Corps when war broke out in 1914. Within two years, General Douglas Haig appointed Hotblack to the Tank Corps, where he was widely known as 'Boots'. Hotblack earned an illustrious war record between 1914 and 1918, being awarded the Distinguished Service Order and Bar and the Military Cross and Bar, being Mentioned in Dispatches five times, and awarded the Russian Order of Saint Anna. As depicted here, Hotblack guided a tank into action under heavy machine gun fire in 1917, a performance which earned him his Distinguished Service Order. Hotblack remained in the Army after the end of the war, eventually retiring as a Major-General. |
 |
| A 37-ton Mark IX armoured personnel carrier, developed in 1918 to deliver fuel, ammunition, spare parts, and rations to tanks on the battlefield, as well as transport the infantrymen required to defend the tanks and mop up enemy personnel left behind the armoured thrust. With its 9.9mm (0.39 inches) of armour, the Mark IX could carry 30 armed infantry in its compartment or 10 tons of supplies, including some stowed on its roof and on sledges towed behind the vehicle. Despite the heat and disorientation of riding inside the Mark IX, being carried into battle protected the infantrymen from small arms fire and saved them a long, tiring slog over miles of broken terrain. An onboard supply of fresh water was also a bonus for the thirsty soldiers. The Mark IX could also be used as a battlefield ambulance or mobile surgery for injured soldiers. The vehicle was manned by a crew of four: the commander, driver, and two gunners who operated the Hotchkiss .303-inch machine guns, one mounted at both the front and rear of the tank. A Ricardo six-cylinder, 150-horsepower petrol engine powered the Mark IX to a top speed of 6.4 km/h (4 mph). |
 |
| The driver position in the Mark IX armoured personnel carrier. |
 |
| A 29-ton Mark V (Male) tank, which entered British Army Tank Corps service in 1918. Among the Mark V's notable improvements over the Mark IV was the Ricardo six-cylinder, 150-horsepower petrol engine, which provided a higher top speed of 7.4 km/h (4.6 mph), and improved steering gear requiring only one man to operate. Despite tight wartime restrictions on high quality alloys and fuel, the Ricardo engine became one of the first mass-produced engines in Britain to be built by multiple companies. Other improvements found in the Mark V included a rear cab for the tank commander, a rear machine gun position, and semaphore signalling equipment mounted on the roof. The tank was operated by a crew of eight men, was armed with two 6-pounder guns and four Hotchkiss .303-inch machine guns, and protected by 13.9mm (0.55 inches) of armour. Like this tank, most Mark Vs carried an unditching beam on their tops which was used if the tank became stuck in mud: the beam would be chained to the tracks and drawn underneath to give the tank something solid to grab onto. The Tank Museum's Mark V saw service at the Battle of Amiens (8-12 August 1918) and is depicted in the markings of the 8th (H) Battalion of the Tank Corps. The Mark V tank served in the British Army after the war, being retired in 1924. |
 |
| A look at part of the First World War gallery at the Tank Museum. |
 |
| The Mark V** (Female) tank, a stretched version of the Mark V designed in 1918 to cross wider German trenches. The Female version was armed with six Hotchkiss .303-inch machine guns. Powered by a Ricardo 225-horsepower petrol engine, the 34-ton vehicle could achieve a top speed of 8.4 km/h (5.2 mph). Protection was provided by 13.9mm (0.55 inches) of armour. Although the interior compartment could carry 15 men and thus the tank could have been used as an armoured personnel carrier, the Mark V** was intended primarily as a fighting tank. The war ended before the Mark V** could enter service. This tank was modified by the Experimental Bridging Establishment (EBE) near Bournemouth, an organisation stood up in late 1918 to investigate how tanks could be adapted to perform specific tasks. Royal Engineers at EBE fitted this Mark V** with a front-mounted jib that could be used to carry and lay a 20-foot bridge, mount a roller to blow up landmines, push and launch a portable bridge, or serve as an ordinary crane for engineering tasks. |
 |
| A display of German First World War weapons and personal kit. Top shelf, left to right: An M1916 Stahlhelm (steel helmet), a reproduction of a stick grenade bundle, and a brass model of a German A7V, the first German tank. Middle shelf: MG08/15 machine gun. Lower shelf, left to right: German sniper's body armour and a Tank-Gewehr M1916 13mm anti-tank rifle. |
 |
| The Mark VIII tank, known as the 'International' as it was jointly designed by Britain and the United States and intended to be built in factories in France. The 37-ton Mark VIII was much longer than the Mark IV and Mark V tanks in order to permit the crossing of wider German trenches. Additionally, the Mark VIII had the engine mounted in a separate engine compartment, thus giving the eight-man crew a greater degree of protection from the heat and fumes generated by the Ricardo or Liberty 300-horsepower petrol engine. The Mark VIII's top speed was 8.4 km/h (5.2 mph) and it was protected by 15.7mm (0.62 inches) of armour, and armed with two 6-pounder guns and seven Hotchkiss .303-inch machine guns. An American Liberty engine is displayed near the rear of the tank. |
 |
| Inside the Mark VIII, the driver sat at the front, with a 6-pounder gunner and loader on either side; the rest of the crew stood on a platform, firing out of the tank's top with machine guns. There was a separate post for the tank's commander, but he usually remained close to the driver to help navigate. The Mark VIII did not enter service before the end of the First World war, and only 14 were manufactured in Glasgow by the Northern British Locomotive Company. Of these 14, only six entered service with the British Army and served until 1930. This Mark VIII and two examples preserved in the United States are the only survivors. |
 |
| A head-on view of the Mark V (Male) tank on the left and the Mark IV (Male) tank, with fascine, on the right. |
 |
| A Hornsby chain tractor, designed by the firm of Richard Hornsby & Son in 1909 as a gun tractor to haul artillery pieces. The 8.5-tonne Hornsby's six-cylinder engine was started using petrol and, once hot enough, was switched to paraffin stored in the three large, red tanks. Not as efficient as petrol, the paraffin fuel emitted an unpleasant odour. Although evaluated in numerous exercises and tested against a horse-drawn gun team, the British War Office decided not to purchase any further Hornsby tractors. The Hornsby's top speed was 19.3 km/h (12 mph). |
 |
| A display on the cavalry of the First World War. This case holds a large leather MK 5 officer's saddle with padded knee rolls and brass fixings. A cavalry trooper's basic uniform and equipment in 1914 consisted of a service dress cap with regimental badge; khaki serge tunic; a five-pocket leather bandolier (1903 pattern), each carrying two five-round charge clips for .303-inch ammunition; riding breeches tied at the ankle; puttees (strips of wool wrapped around the lower legs for support and protection); boots and spurs with lace protectors; a 1908-pattern sword or sabre carried in a scabbard attached to the saddle; a ten-round short magazine Lee Enfield rifle carried in a 'rifle bucket' strapped to the saddle; and a 2.7 metre (8.9 foot) lance made of bamboo with a steel tip (these were only issued to Lancer Regiments and hardly ever used in battle). In addition to this equipment carried by the trooper, his horse carried a 90-round bandolier around its neck, various blankets, spare boots and a change of clothing for the rider, iron rations, two Mills bombs, spare horseshoes and nails, the day's ration of oats, and the mess and water buckets. This load invariably weighed over 114 kg (250 lbs). |
 |
| A display on the logistics system supplying the armoured and cavalry units during the First World War. The tanks and cavalry worked closely together, as when tanks were introduced in 1916 they were meant to smash through obstacles like barbed wire and permit the fast-moving cavalry to exploit the gap and take the offensive to seize ground. The first tanks had a fuel capacity of only 50 gallons (later increased to 70 gallons) and the crew were forced to leave the protection of the tank to refuel using the extra fuel stored in cans on the roof. Refuelling a tank was laborious, requiring 35 two-gallon cans to be emptied into the fuel tank by hand. Later resupply tanks brought additional fuel to the fighting tanks on the battlefield. The horses which served on the Western Front were given a daily ration of 5.4 kg (12 lbs) of oats and 4.5 kg (10 lbs) of hay, nearly 25% below what a horse in Britain would be fed. Out of approximately 1 million horses used by the British Army during the war, only 60,000 (6 in 100) returned to the UK, with the vast majority being killed or sold in Europe at the end of hostilities. |
 |
| A Mark IV tank depicted climbing over a sandbagged obstacle next to a metal sculpture of a horse to demonstrate the terrifying size differential between horse cavalry and the new armoured leviathans. |
 |
| A Peerless armoured car, developed after the end of the First World War using 100 surplus Peerless two-ton trucks that the British War Office had in its possession. With a need for protected vehicles to police Britain's far-flung colonies, the War Office handed over the Peerless trucks to the Austin Motor Company of Birmingham for conversion into armoured cars. The solid tires made for a bumpy and uncomfortable ride for the four-man crew, and the truck's chassis was too long for the armoured cab installed by Austin; however, the Peerless armoured cars proved to be reliable and were deployed to Ireland during the General Strke in 1926. The 5.75-ton vehicle also featured, for the first time ever, a steering wheel at both the front and rear, allowing a speedy withdrawal in reverse rather than having to turn around. Protected by 8mm (0.3 inches) of armour, the Peerless armoured cars were armed with two .303-inch machine guns and had a top speed of 29 km/h (18 mph). Peerless armoured cars were in service between 1919 and 1940. |
Second World War Gallery
 |
| A display of tank crew uniforms. At the start of the Second World War, tank crewmen wore a mix of uniforms, including older service dress uniforms and newer 1939-pattern battledress. Berets were worn in lieu of peaked caps to permit the wearer to get close to the tank's vision slits or gun sight, while a webbing pistol holster was designed to be strapped to the thigh rather than the belt to allow the crewman to sit more comfortably in the tank. In late 1942, a one-piece tank suit was designed and issued to tank crews. This suit had an internal harness and a strap inside the collar to allow crewmen to be lifted out of a tank if injured. In 1944, a denim tank suit was issued prior to D-Day and, in the autumn of 1944, a suit lined with wool and with a detachable hood was issued for the colder weather conditions. In hot climates, tank crews wore shorts or lighter overalls, while a lightweight tank suit with anti-mosquito netting was issued to tank crews serving in the Far East. Footwear consisted of rubber-soled boots or canvas shoes with rubber soles, to prevent slipping on the metal floor of the tanks. |
 |
| The entrance to the museum's Second World War gallery features a stark depiction of the technological advancement in British tank design during the six years of war, between 1939's Matilda I and 1945's Comet. The war saw a rapid increase in armour thickness, gun size, and engine power. Some pre-war theories of tank deployment were found to be flawed, while others were validated through battlefield success. |
 |
| The Matilda I, officially designated the Tank, Infantry, Mark I, A11. Built by hand by Vickers-Armstrongs, only 140 Matilda Is were constructed, using parts that were hand-finished to fit; this led to problems when spare parts were required, which might not fit the specific tank. Although a fairly reliable tank, the 11.2-ton Matilda I was slow (12.8 km/h or 8 mph) and its unprotected suspension was a major weakness. In service, the suspension and tracks wore out prematurely during lengthy drives. The cramped two-man (commander and driver) crew compartment meant the commander had to load, aim, and fire the gun, as well as observe and navigate, and operate the radio while possibly also commanding a unit of other tanks. Designed to support infantry, the Matilda I's .303-inch Vickers machine gun was effective against soldiers and unarmoured vehicles, but useless against other tanks and fortifications; however, the high rate of fire from the machine gun allowed the tank to fire while moving and its 60mm (2.4 inch) of armour was sufficient to withstand any anti-tank gun in service in 1939. |
 |
| Entering service in 1945, the Comet I cruiser tank, also designated the A34, carried a five-man crew and was armed with a 77mm (3 inch) main gun and two 7.92mm Besa machine guns. The 32.5-ton tank's 600-horsepower engine provided a top speed of 46 km/h (29 mph). In contrast to the Matilda I's low production numbers, 1,186 Comet Is were built using mass production techniques which increased both the rate and quality of manufacture. Because many of the automotive components of the Comet I were made of better materials and proven on earlier tank models, the Comet I did not suffer reliability problems when it entered service and could withstand the harsh conditions experienced during extended campaigns. While the Comet I's 77mm gun was a slightly less powerful version of the earlier 17-pounder gun, it remained an effective weapon but could not be fired accurately while the tank was moving. Despite its 102mm (4 inches) of armour protection, the Comet I was vulnerable to the heaviest anti-tank weapons and the handheld German Panzerfaust. |
The Home Front
 |
| A Beaverette Mark IV light reconnaissance car, based on the civilian Standard Saloon car. Beaverettes were developed quickly as a stop-gap measure to replace armoured cars lost in France and during the evacuation from Dunkirk in May-June 1940. The British Army disposed of their Beaverettes as soon as new production armoured cars were available, though the Home Guard continued to use Beaverettes for longer. While the first two models of the Beaverette had open tops and had their armour reinforced with wood, succeeding models had improved protection and visibility; nevertheless, all Beaveretes were notoriously difficult to drive. The Mark IV Beaverette was delivered to the British Army between August 1942 and 1943. The 2.6-tonne Beaverette had a crew of three, 10mm (0.39 inches) of armour protection, a top speed of 38.6 km/h (24 mph), and was armed with a single .303-inch Bren machine gun. The headlight has a shroud to restrict the amount and direction of light, a measure which was applied to civilian vehicles in keeping with wartime blackout regulations. |
 |
A recreation of a corrugated metal Anderson shelter, designed in 1938 to provide protection from air raids. Installed in homeowner's gardens, partially dug into the ground and with soil heaped on the roof, these shelters were provided free of charge to anyone earning less than £5 per week (£324 in today's money). Between February and September 1939, 1.5 million Anderson shelters were distributed by the government. Many people planted vegetables or flowers in the soil piled atop their Anderson shelters to help them blend into the garden.
|
 |
| A Bison mobile bunker designed to be used by the Royal Air Force and the Home Guard to defend airfields and other vulnerable locations against German paratroopers (lacking artillery and tanks) during an invasion of Britain. Built atop the chassis of old, unneeded trucks, Bisons were manufactured by the Concrete Ltd company. Given the weight of the thick concrete bunker additions, the Bison was considered marginally mobile and were really only suitable in situations where they would not need to drive uphill or great distances. The use of concrete avoided the use of steel, which was badly needed by British industry for the manufacture of armoured vehicles and aircraft. |
 |
| Despite being heavy, underpowered, and unreliable, the Bison was an emergency measure in the desperate days of 1940 and was better than nothing. There were three types of Bison, with the Type 3 being the largest. This vehicle is a replica of a Type 2, put together by the Museum of Army Transport decades after the end of the war, using a Thorneycroft Tartar truck and a Type 2 concrete pillbox; the cab is a replica. The Type 2 Bison weighed 15 tonnes and was operated by a crew of two. Around 200-300 Bisons were produced during the war. |
 |
| A Rolls-Royce 1920 Pattern, Mark I armoured car. These old vehicles were pressed back into British Army service on the home front in 1940 to replace armoured vehicles lost during the evacuation from France and before new production armoured vehicles were ready. The 1920 Pattern Rolls-Royce armoured cars in the British Army had been deployed around the world during the interwar years, in such places as Ireland, India, Shanghai, and Iraq and 76 of the original 119 vehicles were still in service by 1939. Those based in Britain were used on the home front, while cars in the Middle East were issued to the Egypt-based 11th Hussars, which used them against Italian forces in the Western Desert between December 1940 and February 1941 (Operation Compass). Operated by a crew of three, the 3.9-tonne Rolls-Royce 1920 Pattern armoured car was armed with a single .303-inch Vickers machine gun, protected by 8mm (0.31 inches) of armour, and had a top speed of 96.6 km/h (60 mph). This vehicle was built by Rolls-Royce in Darby in 1920 and saw service in Ireland before the British withdrawal in 1922 and in Shanghai in 1927; after being deployed on anti-invasion patrols in East Anglia in 1940, the vehicle was acquired by the School of Tank Technology and, later, by the Tank Museum in 1949. |
The Battle of France
 |
| A Guy Mark I armoured car, designed to replace light tracked tanks in the armoured reconnaissance role. They were crewed by three men, armed with one 0.5-inch and one .303-inch Vickers machine guns, and protected by 15mm (0.59 inches) of armour. Wheeled vehicles were cheaper and faster than tracked vehicles, and the 5.3-tonne Guy armoured car had a top speed of 64 km/h (40 mph). Although 101 Guy armoured cars were built, only six vehicles ever saw operational service, with the remainder being used exclusively for training. The Guy armoured car was later adapted into the design for the successful Humber armoured car. The six Guys that saw action were operated by the 'Phantom' Liaison Regiment in France in 1940, being used to track and report the position of friendly forces directly to General Headquarters. Given their presence dashing around the front lines, all six of the 'Phantom' Liaison Regiment's cars were destroyed. This one was the first Guy to be produced, making it the first ever British all-welded armoured car, one of 50 Mark 1 models, of which it is the only survivor. |
 |
| A French SOMUA S35 tank. The S35 was one of the most mobile, well-armoured, and heavily-armed tanks used in the Battle of France in May-June 1940, but suffered from technical and tactical shortcomings. The tank's overworked commander was the lone man in the turret and was simultaneously responsible for both commanding the tank and loading, aiming, and firing the gun. The 19.5-tonne S35 had a crew of three, was protected by 40mm (1.57 inches) of armour, and was armed with one 47mm gun and one 7.5mm MAC mle 31 machine gun. The tank had a top speed of 40 km/h (25 mph). Although 440 S35s were built, 297 were captured by the Germans after the fall of France in June 1940 and were used for training and internal security duties across occupied Europe. Other S35s outside of France continued to serve in the Free French forces alongside the Allies in North Africa well into 1943, until eventually replaced by M4 Sherman tanks. The Tank Museum's S35 has been painted to resemble one in service with the French Army's 4e Cuirassiers in May 1940. |
 |
| An Sd Kfz 265 Kleiner Panzerbefehlswagen / Panzer 1 command tank, one of 184 built by Germany. This light, 5.9-tonne tank was operated by three crewmen, armed with one 7.92mm MG34 machine gun, and protected by 13mm (0.51 inch) of armour. It had a top speed of 40 km/h (25 mph) and was used as a command vehicle, coordinating the tactical operations of multiple tanks while able to keep up with front line forces on the battlefield. The Sd Kfz 265 had a larger superstructure than the standard Panzer 1, which permitted the installation of both a radio receiver and a transmitter: this allowed communications between the tanks of an armoured unit, one of the keys to Germany's blitzkrieg successes against larger Allied forces in France in 1940. Although the Sd Kfz 265 began to be withdrawn from service in late 1940, some units remained in service until late 1942. This tank arrived in Tripoli, Libya on 10 March 1941 and served with the 5th Panzer Regiment of the 5th Light Division. Captured by British forces, it was transferred to the British Army's School of Tank Technology for evaluation and was donated to the Tank Museum in 1951. |
The North African Campaign and the Battle of Greece
 |
| Two tanks from the Western Desert campaigns: an Italian Carro Armato M14/41 (left) and a British Matilda II (right). The M14/41 weighed 14.5 tonnes, had a top speed of 32 km/h (19.9 mph), and a crew of four. It was armed with one 47mm M35 gun and three 8mm mod.38 machine guns, and was protected by 37mm (1.45 inches) of armour. The M14/41 was designed to replace Italy's slower and less mechanically-reliable M13/40 tank, which had performed disastrously against British forces in the latter's Operation Compass (North Africa, December 1940 to February 1941). Italian M13/40s, already outmatched technologically, had been further hobbled during operations by poor leadership and tactics, and 145 M13/40s were captured nearly intact by British forces, who pressed them into service themselves. The first of an eventual 695 M14/41s were built in August 1941. Although the M14/41 served until the end of the fighting in North Africa in May 1943, from its introduction to service its firepower and armour were inferior to that of newer British tanks. The Tank Museum's M14/41 was built in 1942 and shipped to the Italians' Intendensa AS210 distribution centre in North Africa in July 1942, where it is believed to have been abandoned and captured shortly thereafter. No external damage was found on the tank and it was donated to the Tank Museum in 1951. |
 |
| A Matilda II / A12 infantry tank. The Matilda II was first deployed at the Battle of Arras in May 1940 during the German invasion of France and it holds the honour of being the only British tank to be used right to the end of the Second World War. During Britain's Operation Compass offensive in the Western Desert in late 1940 and early 1941, the Italians were unable to stop the 7th Royal Tank Regiment's Matilda IIs from breaking through their defensive positions. Indeed, although a few Matilda IIs suffered mechanical breakdowns or damage from landmines or enemy artillery, only one was destroyed during the entire campaign. For its thick armour, the Matilda II earned the nickname 'Queen of the Desert', though it later proved vulnerable to increasingly powerful German anti-tank guns and was withdrawn from British Army service in June 1942. Nevertheless, the Australian Army armoured units in New Guinea used Matilda IIs up to the end of hostilities with Japan in 1945. The Matilda II weighed 26.9 tonnes, was operated by a crew of four, was armed with one 2-pounder gun and one 7.92mm BESA machine gun, and was protected by 78mm (3.07 inches) of armour. The tank had a top speed of 24.1 km/h (15 mph), entirely suitable for a tank whose primary role was supporting infantry advances. During the war, 2,987 Matilda IIs were built. |
 |
| With a top speed of 40 km/h (25 mph), the A9 Cruiser tank used its speed to rapidly break through enemy defences and outmanoeuvre any opposition. During Operation Compass in North Africa, A9s killed or captured large numbers of Italian infantrymen and knocked out or crushed enemy vehicles and artillery pieces. This speed advantage came at the sacrifice of armour protection, which was only 14mm (0.55 inches); as a consequence, 24 A9s were destroyed by German fire during the defence of Calais, France in May 1940. Out of 125 A9s produced, Britain sent 70 to the Middle East, where they were used until the end of 1941. |
 |
| The Tank Museum's A9 Cruiser was built by shipbuilder Harland & Wolff in Belfast and spent its service life at the Army's School of Tank Technology before being donated to the museum in 1949. Operated by a crew of six, the A9 weighed 12.6 tonnes and was armed with one 2-pounder gun and three .303-inch Vickers machine guns. Two of the Vickers guns were mounted in small turrets on the left and right sides of the forward hull and were especially uncomfortable for the gunners, given the desert heat of North Africa. |
 |
| The A10 Cruiser tank, developed as a more heavily-armoured but slower counterpart to the A9 Cruiser. Both the A9 and the A10 were intended as stopgap designs until better cruiser tanks could be manufactured, and they shared the same automotive components and main gun. The suspension system of the A9 and A10 was considered a great success and was adopted for the Valentine, the most-produced British tank of the war. The A10, of which 175 were built, saw action in France, Greece, and North Africa until withdrawn from service in November 1941. A10s sent to Greece with the 3rd Royal Tank Regiment fought hard battles against German forces and suffered for want of supplies and spare parts. Gradually, the regiment's tanks broke down and had to be abandoned before British and Commonwealth forces were evacuated in April 1941. The 14.4-tonne A10 was operated by a crew of five, had a top speed of 25.7 km/h (16 mph), and had 30mm (1.18 inches) of armour protection. In addition to two 7.92mm BESA machine guns, A10s were armed with one 2-pounder gun. The Tank Museum's A10 is armed with a 3.7 inch howitzer instead of the customary 2-pounder gun, as it was designed as one of 30 Close Support A10s intended to fire smoke shells to mask the movement of friendly tanks on the battlefield. This tank spent its service life at the Army's School of Tank Technology before being donated to the Tank Museum in 1949. |
 |
| The M3A1, named the 'Stuart' by Britain, was the first American-made tank to enter service with British forces. Entering service in North Africa in July 1941, the Stuart proved far more reliable than existing British tanks and was therefore popular with British tank crews; however, the Stuart's armour and firepower were soon outclassed by German tanks and the model was relegated from a frontline fighting tank to a reconnaissance role later in the war. The vulnerability of the Stuart was demonstrated during Operation Crusader (November to December 1941), when only 35 of 165 Stuart tanks of the British 4th Armoured Brigade survived fighting around Sidi Rezegh in Libya, losses which were compounded by bad British tactics against General Erwin Rommel's Panzergruppe Afrika. The 12.9-tonne M3 had a crew of four, a top speed of 58 km/h (36 mph), and armour of 51mm (2 inches) thickness. It was armed with one 37mm M36 gun and three .30-inch M1919 machine guns. American industry constructed 13,859 M3s during the war. The Tank Museum's Stuart is a hybrid, featuring the hull of an M3 and the turret of a later M3A1, which had the raised cupola on the roof removed. It also is powered by a Guiberson T-1020 diesel engine instead of the customary Continental R-670 petrol engine of most M3s. This tank was donated to the Tank Museum by the Brazilian Army in 1990. |
 |
| A Valentine II infantry tank. The Valentine's first major operational deployment was with the 8th Royal Tank Regiment (RTR) in Operation Crusader in North Africa (November to December 1941). Entering the operation with 52 Valentines split up into smaller groups to support the infantry, the 8th RTR lost all but seven of their tanks by the end of Crusader. Despite this inauspicious showing, the Valentine would become the most-produced wartime British tank model, with 7,260 eventually being built. Valentines were mostly used in North Africa, where they served both as infantry tanks and substituted for cruiser tanks like the A9 and A10. Originally armed with a 2-pounder gun and one 7.92mm BESA machine gun, later model Valentines were armed with the larger 6-pounder gun and powered by diesel instead of petrol engines. Many of the specialist armoured vehicles (flame-throwers, mine flails, bridge-layers) developed during the war, known as 'Funnies', used the Valentine chassis. Crewed by three men and protected by 65mm (2.5 inches) of frontal armour, the 17.3-tonne Valentine had a top speed of 24.1 km/h (15 mph). The Tank Museum's Valentine was part of the first batch manufactured by Vickers in October 1940 and spent its service life in training duties, being transferred to the Army's School of Tank Technology and later donated to the museum in 1949. |
 |
| A German Sd Kfz 251/8 Ausf C armoured half-track ambulance. The Sd Kfz 251 was designed to carry Panzergrenadiers (motorised infantry) into battle alongside tanks, but the vehicle was adapted for over 20 different roles, including as anti-tank gun carriers, command vehicles, engineering vehicles, and mobile rocket launcher vehicles. While 15,252 Sd Kfz 251's were built, relatively few were deployed to North Africa, with most of the Panzergrenadiers of Panzerarmee Afrika travelling in trucks, while regular infantry units generally marched on foot. The Sk Kfz 251 had a two-man crew, weighed 7.9 tonnes, was protected by 14.5mm (0.57 inches) of armour, and had a top speed of 53 km/h (33 mph). The Sd Kfz 251's front wheels were unpowered and used only for steering, which affected the vehicle's performance on rough terrain. When tight turns were required, one of the tracks would be braked as with a tank. The museum's Sd Kfz 251 is an un-armed armoured ambulance variant captured in North Africa. It was built by Böhmisch-Mährische Maschinenfabrik in German-occupied Czechoslovakia in 1941; it was capable of carrying two patients on stretchers and four additional seated casualties in addition to the two crewmen. |
 |
| The Union flag flown over the garrison at Tobruk, Libya throughout the siege of the town by German forces between 10 April and 27 November 1941. The flag was presented to the Tank Museum on 11 September 1983 by the Rats of Tobruk Association. |
 |
| The Carro L3/35 or 'Carro Veloce' (fast tank). It was the first mass-produced Italian tank, with 2,800 being built from 1933, half of which were exported. These 3.2-tonne light tanks were small, fast, and manoeuvrable and were designed for the reconnaissance or infantry support roles. They had a two-man crew and a top speed of 42 km/h (26 mph). The standard L3/35 was protected by 15mm (0.59 inches) of armour and armed with a single 8mm mod 14/35 machine gun. Other models, like this one, were also fitted with a flame-thrower ('lancia fiamme') and an unarmoured 520-litre fuel trailer for the flame-thrower. The machine gun and flame-thrower variants of the L3/35 were deployed against British attacks during Operation Crusader with some effectiveness against unarmoured vehicles and personnel; however, many were lost to breakdowns as Italian forces retreated to Gazala. The last Italian units operating L3/35s surrendered in January 1942. This L3/35 was built by the Italian firm of Ansaldo in 1935 and served with the Ariete Armoured Division in North Africa, where it participated Italy's unsuccessful attacks against Tobruk in April-May 1941 and was captured thereafter; it was transferred to the UK for evaluation and later donated to the Tank Museum in 1951. |
 |
| A large Nazi swastika flag captured by a troop of the 8th Royal Tank Regiment (RTR) after overrunning a German 88mm flak gun position in Bardia, Libya during Operation Crusader in November 1941. The flag was found in one of the gun's lockers and was used to assist German aircraft in recognising friendly forces; it was also to have been one of the victory flags to be flown in Alexandria, Egypt following the Germans' hoped-for capture of that British-defended city. The wife of one of the 8th RTR's officers, who was in North Africa, embroidered onto the flag the names of places where the regiment had fought (left side) and the names of the officers who captured the flag, those who had fought an action with the regiment, and those who had been with the regiment three months (right side). More names and battle honours were added to the flag as the war progressed. The flag hung in the officer's mess of the 8th RTR after the war. |
 |
| A view of the Tank Museum's exhibits on the Second World War's Tunisian campaign and the Dieppe raid. |
The Dieppe Raid
 |
| A Churchill II / A22 infantry tank in the Dieppe exhibit. The most heavily-protected British tank of the Second World War, the Churchill II had 102mm (4.01 inches) of frontal armour protection. Weighing 39.1 tonnes, the Churchill II had a five-man crew, a top speed of 25 km/h (15.5 mph), and was armed with a 2-pounder gun and two 7.92mm BESA machine guns. The Churchill II was rushed into production in 1941, leaving many design flaws to be corrected later as part of a rework programme; for example, downward-facing air intakes on the sides of this early model Churchill were prone to sucking up dust that clogged the engine. With these design corrections, the Churchill II developed a reputation as a reliable and highly mobile tank, and 5,640 Churchill IIs were produced over the course of the war. |
 |
| A notable deployment of the Churchill II was the Canadian and British raid on Dieppe, France on 19 August 1942, when 29 of 58 Churchills of the Calgary Regiment were landed. Only 15 of the tanks were able to traverse the beach and get over the town's seawall, and none were able to bypass the anti-tank obstructions installed by the Germans. The Churchill IIs provided covering fire for the evacuation of troops, though all of the tanks and their 175 officers and men were killed or taken prisoner. The Tank Museum's Churchill II, built as a Mk II model, bogged down and was abandoned during the war near Harrogate in Yorkshire. It was recovered and displayed at the now-closed Museum of Army Transport in Beverley, East Yorkshire and transferred to the Tank Museum in 2005. |
 |
A Daimler Dingo scout car, one of 6,626 built during the war. Originally designed as a reconnaissance vehicle, the Dingo's excellent suspension and mobility, coupled with its ability to travel in reverse at the same top speed as going forward made it very popular. For the Dieppe raid, the Calgary Regiment's Headquarters Squadron took seven Dingos ashore, though all but one bogged down on the pebble beach. The Dingo had a two-man crew, weighed 2.8 tonnes, was protected by 30mm (1.2 inches) of armour, and was armed with one .303-inch Bren machine gun. Its top speed was 88.5 km/h (55 mph). The museum's Dingo is a Mark III model built by Daimler in Coventry, but its wartime history is unknown.
|
The Tunisian Campaign
 |
| The M3A1 White scout car was originally designed for reconnaissance duties but, despite its speed of 88.5 km/h (55 mph), it was found to have poor off-road manoeuvrability and protection during its deployment in the Tunisian campaign. As such, it was replaced by better scout vehicles and instead used by the British Army as an armoured truck for support units, such as artillery and signallers. It was also used an armoured ambulance, though its poor suspension made it a notoriously uncomfortable ride for the wounded. The Household Cavalry Regiment used the White scout car during the North West Europe campaign in 1944-45, assigning the vehicles to 'Support Troops' which transported soldiers who ordinarily travelled on foot. The White scout car was operated by a two-man crew, had 12.7mm (0.5 inches) of armour protection, and weighed 5.9 tonnes. Over the course of the war, 20,918 White scout cars were built. This vehicle was found in a French scrapyard by two collectors and restored to running condition in the early 1980s before being donated to the Tank Museum in 1988. |
 |
| An Sd Kfz Panzer III Ausf (model) N. With its 75mm KwK 37 L/24 gun, the Panzer III served alongside Tiger tanks in Germany's Heavy Panzer Battalions in Tunisia. The Panzer III's 75mm gun complemented the Tiger's 88mm anti-tank gun, and the Panzer III's smaller size and lighter weight meant better battlefield mobility than the Tiger. The tall cupola on the turret roof gave the tank's commander good visibility, a factor which contributed to the Panzer III's battlefield successes. The Panzer III was Germany's original main battle tank, with 6,326 of all models being built, of which 700 were Ausf N. Panzer III's contributed to German victories against French and Soviet forces in 1940-42 but were being outclassed by 1943 and the final Ausf N variant was used for fire support missions rather than fighting tanks. The Panzer III Ausf N was manned by a crew of five, had 57mm (2.2 inches) of frontal armour protection, weighed 23.4 tonnes, and had a top speed of 40 km/h (25 mph). In addition to its 75mm gun, it was also armed with two 7.92mm MG34 machine guns. The Tank Museum's Panzer III originally served in Heavy Panzer Battalion 501 in Tunisia between January 1943 and its capture sometime between March and May 1943. After being shipped to the UK for technical evaluation, during which time its side was removed, it was donated to the Tank Museum in 1969. |
 |
| The American M3 Grant medium tank. Hurriedly designed as a stop-gap tank into which the powerful 75mm M2 gun could be installed, the Grant was first used by British forces in North Africa in May 1942 where its gun proved effective against German armoured vehicles and anti-tank artillery despite having a limited traverse of only 45 degrees. The Grant (known as the 'Lee' in British service) was gradually replaced by the Sherman tank in the North African theatre, with the last Grants serving with Allied forces in Tunisia being retired following the German and Italian surrender in May 1943. The Tunisian campaign was the only time the Grant served in significant numbers with American forces, though the British continued to use the Grant in Burma until the end of the Second World War. The 27.2-tonne Grant was operated by a crew of six, was protected by 56mm (2.2 inches) of frontal armour, and had a top speed of 42 km/h (26 mph). In addition to the 75mm gun mounted in a casemate on the hull, the Grant was armed with a turret-mounted 37mm M5 gun and three .30-inch M1919 machine guns. Early Grants like this one employed rivets to fasten together armour plates; when hit by an enemy shell, the heads of the rivets could break off and ricochet around the inside of the tank, killing or wounding the crew. Later models of the Grant were welded instead of being rivetted. One of 6,258 Grants manufactured during the war, the museum's example was manufactured in 1941 and modified to British requirements, which included the removal of the cupola on the turret roof and the addition of a 'bustle' on the back of the turret to accommodate a radio. It was donated to the Tank Museum in 1949. |
 |
| A Crusader / A15 cruiser tank, of which 5,300 were built. The Crusader replaced earlier British cruiser tanks like the A13 and the Covenanter but was better armoured. Although the Crusader played a big part in the tank battles in North Africa from June 1941, the advantage of its speed was negated by the restrictive terrain of the desert. Outmatched by the superior German tanks of the Afrika Korps, the Crusader was gradually replaced in service by the better armed and armoured American-designed Grant and Sherman tanks beginning in late 1942, during the Tunisian campaign. Early Crusaders were armed with the 2-pounder gun, though later models like this Mark III were equipped with the more powerful 6-pounder gun. In addition, they had one 7.92mm BESA machine gun. The 20-tonne Crusader had a crew of three, was protected by 51mm (2 inches) of frontal armour, and had a top speed of 43.4 km/h (27 mph). This Crusader was built in 1942 and spent its service life at the Army's School of Tank Technology before being donated to the Tank Museum in 1949. |
 |
| The Rotatrailer connected to the Crusader was designed to extend the tank's operational range by carrying 60 gallons (227 litres) of petrol in each wheel, as well as rations, water, and ammunition in the central box. Nevertheless, the Rotatrailer proved unpopular with tank crews, as it made reversing the tank difficult and was easily damaged due to its lack of any suspension system. |
The Burma Campaign
 |
| A Mark II Universal Carrier, the most widely-produced armoured vehicle of the Second World War, with over 100,000 being built for Allied forces. The Universal Carrier served in every theatre of the war in a wide variety of roles, including as infantry transports, artillery tractors, and reconnaissance vehicles. They carried heavy mortars and machine guns, towed anti-tank guns, served as radio-equipped forward observation vehicles to call in artillery strikes, evacuated casualties from the battlefield, and operated as mobile flame-throwers. The Universal Carrier was less used in the Far East than other theatres of the war as jeeps were easier to maintain in the very poor climatic and terrain conditions of Asia; however, the Universal Carrier's armour and firepower was a real asset in support of infantry forces. Weighing four tonnes and protected by 12mm (0.47 inches) of armour, the Universal Carrrier had a crew of four, a top speed of 48 km/h (30 mph), and was generally armed with one .303-inch Bren machine gun. Unlike most other armoured vehicles that used separate levers to control the left and right tracks, the Universal Carrier was turned using a steering wheel. This Universal Carrier was built in 1940 by Sentinel Wagon Company in Shrewsbury and was later used by the Military Vehicle Experimental Establishment at Chertsey until donated to the Tank Museum in 1981. |
 |
| A Japanese Type 95 Ha-Go light tank, one of 2,300 built. Designed to support Japanese infantry against Chinese forces which possessed few tanks, the Ha-Go was subsequently used against Soviet forces at Khalkhin Gol in Mongolia and in the Japanese invasions of Malaya, Burma, and the Philippines. Japanese armoured units deployed Ha-Go tanks in jungles considered impassable by British defenders, contributing to early Japanese victories. Small numbers of the tanks were used in the Japanese advance into Imphal, India in 1944 and British forces confronted a few Ha-Gos during their advance into Burma in 1945. Although effective in the early days of the war, the Ha-Go was quickly outmatched by the Grant and Sherman tanks brought into service by the Allies in the Far East. The 7.4-tonne Type 95 Ha-Go tank had a crew of three and a top speed of 45 km/h (28 mph). It was protected by 12mm (0.47 inches) of frontal armour and was armed with one 37mm Type 94 gun and two 7.7mm Type 97 machine guns, including one mounted on the rear of the turret. The museum's Ha-Go is believed to have been captured in Burma, sent to Calcutta for evaluation, shipped to Britain thereafter, and donated to the Tank Museum in 1951. |
 |
| A Valentine scissors bridge-layer. As the Valentine infantry tank was obsolete by early 1942, large numbers were converted into specialist vehicles, such as the scissors bridge-layer. The Number 1 Scissors Bridge could be unfolded to span 30-foot (9.1 metre) gaps across rivers, damaged roads and bridges, and shell craters. The three large rollers in front of the bridge rested on the ground during the bridge's launch or recovery and helped balance the vehicle, which was front-heavy during these manoeuvres. The scissors bridge could support weights up to 30.5 tonnes, though the trackways were criticised for being too far apart to accommodate the wheelbase of a jeep. During the British advance into Burma in 1944-45, Independent Bridging Troops of three vehicles each were attached to Divisional and Corps headquarters. Scissors bridge-layer Valentines were based on the diesel-powered Mark II and III versions of the tank and the 239 Valentine bridge-layer conversions that were built saw service with Allied forces in North West Europe, Italy, and Burma. The Valentine bridge-layer had a crew of two, a weight of 19.6 tonnes, a top speed of 16.1 km/h (10 mph), and 60mm (2.36 inches) of armour protection. This Valentine bridge-layer was originally built as a Mark I Valentine infantry tank in 1941 and was the first to be converted into a bridge-layer in early 1942. It was used for training at the Experimental Bridging Establishment and then sent to the School of Tank Technology before being donated to the Tank Museum in 1949. |
Operation Overlord / Battle of Normandy
 |
| A Tetrarch light tank. Originally designed in the late 1930s, only 177 Tetrarchs were built as light tanks were phased out of service following experience in the Battle of France in 1940. As such, the Tetrarch struggled to find a new role, and 20 were shipped to the Soviet Union as part of Lend-Lease aid in early 1942. In 1944, 20 Tetrarchs were deployed with the 6th Airborne Armoured Reconnaissance Regiment when it landed in Normandy in June. Weighing only 7.6 tonnes, the Tetrarchs could be carried in the big Hamilcar gliders used by Allied airborne forces to carry heavy equipment and vehicles to their landing zones. The absence of significant German resistance on D-Day meant that the Tetrarchs of the 6th Airborne Armoured Reconnaissance Regiment supported the paratroopers in reconnaissance duties rather than fighting German tanks. The Tetrarch had a crew of three, 14mm (0.55 inches) of frontal armour, and a top speed of 64.4 km/h (40 mph). A unique feature of the Tetrarch was its steerable wheels and tracks which mimicked a car rather than using the customary method of turning a tank by stopping or slowing one of the tracks. This Tetrarch was built in November 1940 and was converted into a Close Support Tetrarch through the replacement of the standard 2-pounder gun with a 3-inch howitzer; it was also armed with one 7.92mm BESA machine gun. It spent its service life as a training vehicle at the Gunnery Wing of the Armoured Fighting Vehicle School at Lulworth until being donated to the Tank Museum in 1949. |
 |
| One of 754 Churchill Assault Vehicle Royal Engineers (AVRE), based on the powerful and well-armoured Churchill tank. The Churchill's attributes made it ideally suited to being an AVRE, used by military engineering units to break through difficult terrain and clear obstacles from invasion beaches, creating safe paths inland for troops and other vehicles. When faced with heavy enemy fire, however, the AVRE's six-man crew could also use their vehicle in a combat role, employing the AVRE's two onboard 7.92mm BESA machine guns. Square doors on the sides of the AVRE allowed engineers to enter and exit the vehicle without having to use top-mounted hatches on the hull that would have exposed them to enemy fire. In place of the Churchill tank's main gun, the AVRE was fitted with a 290mm Petard demolition mortar. Additionally, a mounting frame installed on the AVRE's hull permitted the carriage of trackways, a deployable bridge, or a gap-crossing fascine. Weighing 39.1 tonnes and with 102mm (4 inches) of frontal armour, the AVRE had a top speed of 25 km/h (15.5 mph). This AVRE was originally built as a Mark III Churchill tank in 1942 and subsequently converted. After years serving as a gunnery target at the Otterburn Ranges in Northumberland, UK, it was recovered in 1988, restored to running order, and donated to the Tank Museum. |
 |
A frame-mounted training turret for the Centaur anti-aircraft tank, equipped with two 20mm Polsten cannon. The 33.5-tonne Centaur was originally designed as a replacement for the Crusader tank; however, it proved to be underpowered and the standard model never entered service, with only a few specialist variants being deployed. During the Allied landings at Normandy in June 1944, each British armoured regiment was supplemented by six tanks with anti-aircraft turrets fitted to old Crusader tank hulls. The lack of significant German aircraft attacks on the landing forces meant these anti-aircraft tanks were largely used against ground targets instead.
|
 |
| Two German tanks encountered during the Normandy campaign: the Sd Kfz 123 Panzer II Ausf L (left) and the Sd Kfz 182 Tiger II Ausf B (right). Note the waffle-patterned Zimmerit on the hull of the Tiger II: Zimmerit was a paste applied to German armoured vehicles which prevented enemy magnetic mines from sticking to the hull. |
 |
| The Tiger II was the most powerful tank of the Second World War, with a gun capable of destroying any Allied tank at ranges of over a mile and its 180mm (7.1 inches) of frontal armour making it effectively invulnerable. Nevertheless, the Tiger II was underpowered, consumed large quantities of precious fuel, and suffered from a number of mechanical defects that made it prone to breakdowns. With a production run of only 489, the Tiger II would never have any impact on the outcome of the war. In operations in the bocage country of rural Normandy, the Tiger II did score some successes against Allied tanks, but anti-tank fire and breakdowns led to a steady stream of losses during the campaign. The Tiger II weighed 69.8 tonnes, had a top speed of 38 km/h (23.6 mph), and a crew of five. It was armed with an 88mm KwK 43 main gun and two 7.92mm MG34 machine guns. This Tiger II, an Ausf (model) B variant with hull number 104, was built in July 1944 and the next month was assigned to the 1st Company Headquarters, SS Heavy Panzer Battalion 101. On 29 or 30 August 1944, it was abandoned by its crew at the town of Aux Marais, north of Paris. The damage to Tiger 104's right side was caused by 75mm shells from an Allied Sherman tank, inflicted after the Tiger's abandonment. |
 |
| The Panzer II Luchs (Lynx) was the final version of the Panzer II design and intended as a scouting and reconnaissance vehicle rather than as a fighting tank. Development of the Luchs began in 1939 and included the installation of a more powerful engine than in the standard Panzer II and an improved suspension system of interleaved road wheels for a smoother ride over rough terrain. The Luchs had thicker armour and weighed four tonnes more than a standard Panzer II, yet enjoyed a much longer range and a top speed of 60 km/h (37.2 mph) versus the 40 km/h (24.9 mph) of the standard Panzer II. The Luchs only entered service in 1944 and only 100 of the 800 vehicle order were actually built before the end of the war. German tank losses in Normandy meant that the Luchs was often pressed into frontline service as a combat vehicle. The Panzer II Luchs had a crew of four, weighed 13 tonnes, was protected by 30mm (1.2 inch) frontal armour, and mounted a 20mm KwK 38 gun and one 7.92mm MG 34 machine gun. This Panzer II Luchs was captured while serving with the 1st Company of the 9th Armoured Reconnaissance Battalion, part of the 9th Panzer Division in Normandy. |
 |
| An Sd Kfz 234/3 Schwerer Panzerspähwagen (armoured car). The Sd Kfz 234 family of armoured cars comprised four variants, each with different armament; however, while they had better armour protection and speed than previous armoured cars, they only entered service late in the war and only 478 were built. The 234/3 model, of which 88 were manufactured, was designed to give fire support to more lightly-armed reconnaissance vehicles using its short-barrelled 75mm KwK 51 gun. The Sd Kfz 234/3 had a crew of four, weighed 11.7 tonnes, had 30mm (1.2 inches) of armour protection, and a top speed of 80 km/h (50 mph). In addition to the main driver at the front, a rearward-facing second driver provided the ability to quickly extricate the vehicle from danger by driving in reverse. Another notable feature of the Sd Kfz 234 family was their use of diesel engines, a rarity amongst German vehicles, which mostly used petrol engines. |
 |
| In Normandy, German reconnaissance units, such as those equipped with the Sd Kfz 234 armoured cars, were used in rearguard actions to hold positions and allow the retreat of other German forces. The speed of the armoured cars allowed them to pull back quickly once ordered, lowering the risk of them being captured by advancing Allied forces. This Sd Kfz 234/3, bearing the crest of the Wehrmacht's 116th Panzer Division, was captured in full working order at the end of the war and subsequently used in Britain for mobility testing against more modern vehicles. |
 |
| A German Sd Kfz 303 Leichter Ladungsträger Goliath, a tracked, wire-guided bomb used to clear mines or obstacles. German forces attempted to deploy Goliaths against American troops landing at Utah Beach in Normandy on 6 June 1944, but Allied bombardment had damaged the Goliaths' electronics, and the vehicles proved impossible to control. Powered by a petrol engine, the Goliath weighed 430 kilograms (948 pounds), had a range of up to 650 metres (2,132.5 feet), and carried a 100 kilogram (220 pound) explosive charge. Its top speed was 12 km/h (7.5 mph) and it was protected by 10mm (0.39 inches) of armour. A total of 4,929 Goliaths were built by Germany during the war. |

The Sd Kfz 161 Panzer IV Ausf (model) D. With 8,519 Panzer IVs built, it was the most numerous German tank of the Second World War and the only tank of any nation to be built over the entire duration of the war. Although originally designed as an infantry support tank to complement the Panzer III as the German Army's main battle tank, it was soon discovered that the larger Panzer IV was better able to accommodate upgrades. With the installation of additional armour and a more powerful gun, the Panzer IV soon became the backbone of the German armoured forces by the middle of the war. In Normandy, the only German armoured unit to attack Allied forces landing on D-Day (6 June 1944) was the 21st Panzer Division, equipped with obsolete tanks, including older model Panzer IVs.
 |
| The Panzer IV was originally equipped with the short-barelled 75mm KwK 37 gun designed to fire high explosive shells in support of infantry. Many Panzer IVs were subsequently upgraded to the long-barrelled 75mm KwK 40 gun of the type seen on the Tank Museum's Panzer IV. This gun proved to be superior to all previous German tank guns, demonstrating its precision and penetrating power in combat. Additional armour plating ('skirts') added to the sides of the turret increased protection against enemy anti-tank rifles, whose crews were trained to target points on tanks with thinner armour. The Panzer IV Ausf D had a crew of five, weighed 20 tonnes, had a top speed of 40 km/h (25 mph), and was protected by 50mm (1.9 inches) of frontal armour. In addition to the 75mm KwK 40 gun, the Panzer IV was equipped with two 7.92mm MG34 machine guns. The museum's Panzer IV was originally built with the short-barrelled 75mm gun and later upgraded. It was being used as a driver training vehicle when captured by Allied forces. |
'The Great Swan'
 |
| Some of the vehicles in the exhibit on the 'Great Swan', the nickname given to the period between August and September 1944 when Allied mechanised forces surged northwest through France and Belgium chasing the fleeing and demoralised remnants of the German Army following its catastrophic defeat in the Falaise Pocket in the Battle of Normandy. After two months of grinding, bloody combat in Normandy, during which the Allies suffered 209,000 casualties and the Germans 400,000, the Great Swan bred an optimism that the war might be over soon, especially as the Allies liberated town after town, much to the delight of the local citizenry. Allied ground forces commander General Bernard Montgomery pushed his subordinates to keep up the pace of the advance so as to prevent the Germans from being given an opportunity to regroup and form a defensive line. However, despite moving faster and further than the Germans had during their blitzkrieg campaign of 1940, the Allies were unable to prevent a stiffening of German resistance, which dashed any hopes of ending the war in 1944. |
 |
| A Humber scout car, designed to address the shortage of Dingo armoured cars available for armoured reconnaissance. Eventually, 4,300 Humbers were built. The Humber was larger and faster than the Dingo, with excellent cross-country mobility and the added benefit of a covered top providing better protection for its three-man crew. Its relatively quiet engine permitted the Humber to stealthily approach the front line and reconnoiter enemy positions. In Normandy, Humbers were used to scout ahead for armoured units; however, due to the thick hedgerows surrounding farmers' fields, the Humbers were often the first to be hit by fire from concealed German tanks and anti-tank guns lying in wait to ambush Allied forces. The Humber scout car weighed 3.4 tonnes, was protected by 14mm (0.55 inches) of armour, and had a top speed of 96.6 km/h (60 mph). It was armed with one .303-inch Bren machine gun. |
 |
| This Humber was nicknamed 'Jack in the Box II' and was driven by Captain John Gull, Technical Adjutant of the 1st Battalion of the Coldstream Guards from his landing in Normandy on 3 July 1944 to the end of the war. In all, Captain Gull covered over 18,500 kilometres (11,500 miles) in this Humber without a breakdown; after the war, Gull drove it back to the UK and donated it to the Tank Museum in 1949. Note the markings on this vehicle: the '52' indicates that it belonged to the second most senior armoured battalion (Coldstream Guards) in the 5th Guards Armoured Brigade, while the yellow diamond denotes that it belonged to the Headquarters Squadron of the battalion. The left fender (unseen) is painted with the insignia of the Guards Armoured Division, in which the 5th Guards Armoured Brigade served. |
 |
| A Mark II Ram cruiser tank, the first tank designed and built in Canada. The Ram was developed from the American M3 Lee design and shared with the Lee (and the Sherman) the Volute Vertical Suspension System which performed well, was easy to maintain, and did not take up space inside the tank. A total of 2,032 Rams were built. While it was used for training in Canada and the UK, the Ram was never deployed as a fighting tank since there was a sufficient supply of M4 Sherman tanks to equip the Canadian Army armoured units in Europe. Some Rams were converted into mobile forward observation posts for artillery spotters or into the Kangaroo armoured personnel carrier and did see combat service in Europe. The Ram had a crew of five, weighed 29.5 tonnes, had 87mm (3.4 inches) of frontal armour, and a top speed of 40 km/h (25 mph). It was armed with a 6-pounder gun and two .30-inch M1919 machine guns. This Ram was built by the Montreal Locomotive Works in 1943 and transferred to the Netherlands Army after the war. The Dutch replaced the 6-pounder gun with a 75mm gun and later used the tank as a target on a firing range before the vehicle was donated to the Tank Museum in 1988. |
 |
| Looking down the line of vehicles in the Great Swan exhibit. They are arranged in a manner reminiscent of a column of Allied tanks driving down a road in France or Belgium, with a backdrop of historical photos of the liberation of towns in 1944. |
 |
| A T17E1 Staghound armoured car, designed in the United States and supplied to Allied armoured divisions as reconnaissance vehicles. As armoured car regiments often fanned out over wide areas to scout enemy positions, their commanders needed to coordinate these patrols and did so from the large Staghounds. Although the 13.9-tonne Staghound was unwieldy for manoeuvring in confined spaces and was prone to bogging down in soft terrain, it was ideal as a Headquarters vehicle due to the ample interior space for unit commanders' maps and radios. Frontline reconnaissance patrols were therefore generally left to the smaller and more nimble Dingo and Daimler armoured cars. A total of 3,844 Staghounds were built during the war. The Staghound had a crew of five, a top speed of 89 km/h (55 mph), 44.5mm (1.75 inches) of armour protection, and was armed with a 37mm M6 gun and two .30-inch M1919 machine guns. This Staghound was built by Chevrolet in 1942 and was transferred to the Tank Museum in 1949. |
 |
| An M10 Achilles self-propelled gun, the British version of the American M10 Tank Destroyer. The main difference of the Achilles, of which 1,017 were built, was the replacement of the standard 3-inch gun of the American model with a more powerful 17-pounder gun. The weight of the 17-pounder's barrel necessitated the addition of solid metal counterweights to the back of the turret to prevent the turret becoming unbalanced and therefore unable to be rotated when the vehicle was on a slope. The Achilles entered British service in mid-1944 with anti-tank regiments of the Royal Artillery and was used to demolish enemy observation posts in church towers, factories, and silos, as well as contribute to massed artillery barrages against enemy positions, and hold bridges and bridgeheads. During the Great Swan of August-September 1944, when Allied forces were rapidly pursuing fleeing German troops, the Achilles was also used offensively, providing supporting fire for more lightly armed units as they advanced. Although resembling a tank, the Achilles had less armour than a tank and an open top, and so was unable to withstand heavy enemy fire. The 29.6-tonne Achilles had a crew of five, 57mm (2.24 inches) of frontal armour, and a top speed of 40 km/h (25 mph). In addition to the 17-pounder gun, it was also armed with one .50-inch M2 machine gun. This Achilles was originally built as a standard M10 at the Grand Blanc Arsenal in Michigan, USA in 1943 and converted to the Achilles variant in the UK. In 1950-51, it was one of 36 donated to the Belgian Army which donated it to the Tank Museum in 1983. |
 |
| An M4A4 Sherman V. Given that 49,234 Sherman tanks were built during the war, no single engine was available in sufficient quantities; as such, four different engines were used, with the 7,499 Sherman Vs being powered by a complicated A57 Multibank engine that necessitated a longer hull than other Sherman variants. The Sherman V, which was reliable and easy to repair, was very popular with British tank crews and was the most widely-used Sherman in the British Army. Notwithstanding its reliability even after days of driving long distances at high speed, the Sherman was notorious for its comparatively thin armour and vulnerability to catching fire ('brewing up') when hit by enemy tank shells. This was due to the Sherman's open ammunition bins inside the tank, which meant that any penetration of the tank by enemy fire would inevitably cause the ammunition to explode. The decision to weld extra armour plate onto the exterior of the Sherman to protect the ammunition bins only served to give German gunners a convenient aiming point, however. The Sherman V had a crew of five, weighed 31.6 tonnes, and had a top speed of 32 km/h (20 mph). It was protected by 76mm (3 inches) of frontal armour and was armed with one 75mm M3 gun and two .30-inch M1919 machine guns. This Sherman V was built in 1943 by American auto manufacturer Chrysler. After a period in the collection of the Imperial War Museum and, later, as a gate guard at the headquarters of 3rd (UK) Division in Bulford, Wiltshire, it was transferred to the Tank Museum in 2019. |
 |
| A Mark I Morris Light Reconnaissance Car (LRC). These vehicles were used by the British Army's Reconnaissance Corps to scout German positions and report back using their powerful onboard radios, as well as by the Royal Air Force Regiment to defend captured airfields in northwest Europe. Despite the risk of being outnumbered and outgunned by German forces encountered during scouting patrols, the appearance of the Morris LRC and aggressive tactics by its crew could often force the enemy to retreat. One of a number of similar Light Reconnaissance Cars, the Morris LRC was built in a two-wheel drive version (Mark I) and a four-wheel drive version (Mark II); a total of 2,231 Morris LRCs were built, of which about 1,000 were Mark IIs. Of note, the driver sits in the centre of the cab in order to more easily judge the vehicle's position, despite the increased difficulty of entering or exiting entailed by this arrangement. The Mark I Morris LRC weighed 3.4 tonnes, had a crew of three, a top speed of 80 km/h (50 mph), and 14mm (0.55 inches) of armour protection. It was armed with one .303-inch Bren machine gun and one .55-inch Boys anti-tank rifle. This Morris LRC was one of 500 ordered in May 1941 and its wartime service record is unknown. It was restored by the Morris Motors Company and donated to the Tank Museum in 1961. |
 |
| An M9A1 half-track. These vehicles, developed from the wheeled M3 scout car, were used by motorised infantry battalions of the British Army serving alongside armoured regiments. The armoured half-tracks gave the infantry protection and allowed them to keep pace with the fast-moving tanks they were tasked to support. Additionally, the M9A1 was also used by supporting troops in the armoured regiments themselves, such as the quartermasters and the electrical and mechanical engineers ('Fitters') responsible for resupplying and repairing the tanks, respectively. Over 40,000 half-tracks were built and they performed a wide variety of roles, including troop transport, artillery tractor, ambulance, recovery vehicle, anti-aircraft gun platform, and mortar carrier. |
 |
| The M9A1, of which 3,433 were built, was one of four similar half-track variants, with the M2 and the slightly larger M3 being used by American forces and the equivalent M9 and M5 being operated by Allies. Of note, unlike the tracks of tanks, which were composed of individual metal plates linked together with pins, the tracks of the M9A1 and its sister half-tracks were a single continuous rubber band with embedded steel cables for added strength. The versatility of the half-track meant that all four variants remained in service with numerous nations for decades after the end of the Second World War. The M9A1 weighed 9.6 tonnes, had a crew of two, and a top speed of 68 km/h (42 mph). It was protected by 8mm (0.31 inches) of armour and was armed with one .50-inch M2 machine gun. This M9A1 was built by the Chicago-based International Harvester Company and remained in British Army service for several years after the war, being donated to the Tank Museum in 1965. |
 |
| An American-designed M5A1 Stuart light tank, a development of the M3A3 Stuart with new twin Cadillac V8 engines, automatic transmission, and a larger turret. A total of 10,958 M5A1 Stuarts were built during the war. The M5A1 was used by the reconnaissance troops of British and American armoured regiments to scout ahead and identify good approach routes and enemy positions, which would be radioed back to regimental headquarters. Each armoured regiment had 11 Stuarts which, despite being outgunned and poorly protected by 1944 standards, still possessed an impressive top speed of 58 km/h (36 mph), ensuring its continued worth to both the British and American armies as an armoured reconnaissance vehicle. The M5A1 Stuart had a crew of four, weighed 15.4 tonnes, was protected by 67mm (2.6 inches) of frontal armour, and sported a 37mm M6 gun and three .30-inch M1919 machine guns. The large, curved metal box on the side of the Stuart's turret was a cover for the roof-mounted machine gun, which could be folded down into the box for protection or to keep it out of the way. This Stuart's service history is unknown but it was received by the museum in 1949. |
 |
| A final look at the Allied vehicles in the exhibit on the 'Great Swan' offensive, August-September 1944. |
The Italian Campaign / Gothic Line
 |
| The exhibit on the Italian Campaign focuses on armoured units involved in attacking the Germans' Gothic Line defences, spanning northern Italy from the Tyrrhenian to the Adriatic seas, in the summer of 1944. Although seen by Allied decision-makers as Europe's 'soft underbelly', Italy was transformed by German forces into a series of formidable defensive lines anchored on the difficult terrain and fast-flowing rivers that came down from the Apennine Mountains running for much of the length of the Italian peninsula. The Gothic Line was the most heavily-defended of these German lines and, in combination with challenging weather and clever German defensive tactics, served to deny a quick victory to the Allies. As a result, Allied ground forces were forced to endure hard fighting from August 1944 through the winter of 1944-45 before the Gothic Line was finally breached in early March 1945. |
 |
| A Mark II AEC armoured car, known as a Matador. The Matador equipped the Heavy Troops of armoured car regiments during the Italian Campaign; however, the static nature of the warfare on the Gothic Line, poor weather, and rough terrain limited the mobility of these units and many times the armoured car crews conducted their reconnaissance work on foot. The vehicles were useful in moving around quickly behind friendly lines on resupply or fire support missions, but they proved too tall for effective scouting and prone to rollovers due to their high centre of gravity. Additionally, the Matador's weight of 12.7 tonnes left it vulnerable to sliding off muddy roads and getting stuck in ditches; as a result, the Matadors were often placed at the end of vehicle columns so that they would not block the road in the event of an accident. |
 |
| Another look at the Matador, which had a crew of four, a top speed of 66 km/h (41 mph), and 30mm (1.2 inches) of armour protection. It was armed with a 6-pounder gun and one 7.92mm BESA machine gun. Both the Mark II Matador and the Mark III version (with a 75mm gun) were valued in the fire support role as their guns were the same as those found on tanks. Note the thick ring at the end of the gun barrel: this is a counterweight to balance the gun, which was moved up and down solely by the gunner's own strength and not by any elevating mechanism. A total of 629 Matadors of all variants were produced during the war. This Mark II Matador was built by the UK's Associated Equipment Company in 1942 and its service history is unknown; however, as it was donated to the Tank Museum by the British Army's School of Tank Technology in 1949, it is likely that it never saw combat and was used for training and evaluation only. |
 |
| A German Sd Kfz 142/1 Sturmgeschütz III Ausf (model) G assault gun. The StuG III was the most lethal and the most-produced armoured vehicle of the German army in the Second World War, with about 10,000 built. Although originally designed to support the infantry using a short-barrelled 75mm KwK 37 gun firing high explosive shells against bunkers and other similar targets, the StuG III Ausf G was fitted with a long-barrelled 75mm Sturmkanone (Stuk) 40 gun to serve as a potent tank killer. During the Gothic Line fighting, the Germans deployed well-camouflaged StuG IIIs in strategic positions along predictable approach routes in the rough terrain and knocked out many Allied tanks in ambushes without being seen. The 23.9-tonne StuG III had a crew of four, a top speed of 40 km/h (25 mph), and 80mm (3.15 inches) of frontal armour protection. This StuG III was built sometime between August 1943 and September 1944 and was donated to the Tank Museum in 1951. It spent many years on display at the Land Warfare Hall of the Imperial War Museum in Duxford, England before returning to the Tank Museum in 2019. Note the remnants of the original Zimmerit paste on the StuG's hull; Zimmerit made it difficult for magnetic mines to adhere. |
 |
| A Mark IV Churchill / A22 infantry tank, one of 5,640 built during the war. Between their inauspicious debut in the Dieppe raid in August 1942 and the Gothic Line fighting of 1944, the Churchill had been upgraded with a new turret and a more powerful 6-pounder or 75mm gun. Note the large idler wheels at the front of the tank, which could be adjusted forwards or backwards to keep the tracks taut; this avoided the risk of the tracks coming off and immobilising the tank. The slow speed of the Churchill was not a problem in its assigned role of supporting infantry fighting on foot, and the tank's thick armour and ability to climb terrain considered impassable to other tanks was greatly valued by Churchill tank crews. Churchill tanks fought in the campaigns in Tunisia, Italy, and North West Europe. In northern Italy during the autumn and winter of 1944-45, infantry soldiers often perched atop the Churchills for a ride to the battlefront as the tank was able to crawl through the thick mud caused by heavy seasonal rains. The Churchill Mark IV had a crew of five, weighed 39 tonnes, had a top speed of 25 km/h (15.5 mph), and 102mm (4 inches) of frontal armour protection. In addition to the 6-pounder gun, it was armed with two 7.92mm BESA machine guns. This Churchill was originally built as a Mark I or II in 1941 and later converted to a Mark IV. Although its service history is unknown, it was at some point converted into a 'Twin ARK' bridge-laying vehicle and then restored back to its Mark IV configuration by The Churchill Trust. It has been on loan to the Tank Museum since 2018 and is painted in the markings of 3 Troop, A Squadron of the North Irish Horse, one of the armoured regiments that fought in the Gothic Line battles. |
 |
| A look at the top of the Churchill's turret with hatches open. The tank commander is the one in the leather jerkin holding the map. The mannequins represent members of the North Irish Horse regiment, which was first deployed overseas in February 1943, fighting in Tunisia until the Axis surrender there. In April 1944, the North Irish Horse was sent to Italy where it took part in the attack on the Hitler Line in May and took heavy casualties. In the Gothic Line battles from August 1944 onwards, the regiment supported infantry attacks against German bunkers and gun positions. The mannequins were designed and sculpted by three students at Arts University Bournemouth as part of their degrees in model making. |
 |
| An M4A1 Sherman IIA, one of 3,426 of this model built during 1944-45. (The total number of Sherman tanks of all variants built during the war was 49,234.) The Sherman IIA was given the slightly larger 76mm gun in place of the 75mm gun used on the preceding Sherman model. This change necessitated the adoption of a new, larger turret from the abandoned T23 tank project in order to give the Sherman IIA's crew sufficient space. While the 76mm anti-tank ammunition was found to be somewhat more effective than its 75mm equivalent, the increased effectiveness was not as much as hoped for and the 76mm high explosive shell was actually less powerful than the 75mm equivalent. In Italy, the fighting required more use of high explosive rounds (used against German fortifications and personnel) than anti-tank rounds. As a result of shortages in the supply of 75mm gun-equipped Shermans, Sherman IIAs began entering British and South African service in Italy around the time of the Gothic Line battles. The two types of Sherman operated side-by-side until the end of the Second World War and the Sherman IIA continued to serve in several nations' armies until the 1960s. The Sherman IIA had a crew of five, weighed 32 tonnes, had a top speed of 39 km/h (24 mph), and possessed 88.9mm (3.5 inches) of frontal armour protection. In addition to its 76mm gun, it was also armed with two .30-inch M1919 machine guns. This Sherman IIA was built by the Pressed Steel Car Company of Chicago, USA and shows evidence of modifications made under the Americans' Mutual Defense Assistance Program of the 1950s, which included the transfer of Sherman tanks to European partners. The Tank Museum received the Sherman IIA in 1989. |
Operation Infatuate
 |
| The exhibit on armoured vehicles used in Operation Infatuate, the British and Canadian assault on Walcheren Island in the estuary of the River Scheldt in November 1944. The operation was launched by Field Marshal Bernard Montgomery's 21st Army Group as a means of clearing German forces from the territory on eiter side of the River Scheldt so that the port of Antwerp, previously liberated in September 1944, could be used to import reinforcements and supplies needed by Allied forces to continue the push toward and into Germany. Prior to the opening of the port of Antwerp, all Allied supplies were brought ashore in Normandy and trucked hundreds of kilometres to frontline forces moving ever eastward. |
 |
| A Sherman Crab flail tank, designed to beat the ground with chains in order to detonate enemy landmines and clear a path for Allied forces. The Crab was one of the types of specialist vehicles adapted by the British using various models of tank, and approximately 550 Crabs were manufactured. The Crab's drum, mounted at the end of the arms connected to the tank, rotated three times per second to generate the force necessary to detonate mines buried in the ground. Although protected by the tank's armour, the crew needed to keep the Crab moving in a straight line and at walking speed to ensure successful de-mining, while enduring the storm of dirt kicked up by the chain flails which made it impossible to see or fire against enemy forces. In November 1944, ten Crabs were among the 79th Armoured Division's specialist vehicles committed to the British landings at Westkapelle on Walcheren Island as part of Operation Infatuate. Although only three of the Crabs made it off the beach successfully, and all three were later swamped by the sea that night, they did make an important contribution to the success on Walcheren. The Sherman Crab had a crew of five, weighed 34.5 tonnes, and had a top speed of 32 km/h (20 mph). It was protected by 76mm (3 inches) of frontal armour and was armed with a 75mm M3 gun, one .50-inch M2 machine gun, and two .30-inch M1919 machine guns. The museum's Crab was built by Chrysler's Detroit Tank Arsenal in April 1943 as an M4A4 Sherman tank and later converted into a Crab in the UK. It was donated to the Tank Museum in 1949. |
 |
| A Mark IV Landing Vehicle Tracked (LVT-4) Buffalo. Originally developed as an amphibious rescue vehicle for the Florida Everglades, the Buffalo was adopted by the US Marine Corps because it was capable of swimming, crossing coral reefs, and driving on land. Known as an Amtrac (Amphibious Tractor) to the Marines, LVTs were used extensively in the American island-hopping campaign in the Pacific, but were also deployed in the Allies' Italian and North West Europe campaigns. In Operation Infatuate, the LVT-4s of Britain's 79th Armoured Division ferried Commandos ashore at Westkapelle on Walcheren Island and were also used to move supplies and casualties across the flooded sections and heavy mud of Walcheren. A total of 18,616 LVTs were built, including 8,348 of the LVT-4 variant. The LVT-4 Buffalo had a crew of three, weighed 16.5 tonnes, and had a top speed of 30 km/h (20 mph) on land and 12 km/h (7.5 mph) in the water. It was protected by 13mm (0.5 inches) of armour and armed with one 20mm Oerlikon cannon and two .50-inch machine guns. This Buffalo came to the Tank Museum in 1949. |
 |
| An M29C Weasel cargo carrier derived from an oversnow vehicle and manufactured by automaker Studebaker in the United States. Of the 15,982 Weasels built during the war, 10,627 were of the M29C variant. Weighing only 1.7 tonnes, the Weasel's low ground pressure made it ideal for traversing heavy mud impassable to heavier vehicles and it was also less prone to setting off buried landmines. Nevertheless, the Weasel had a limited cargo capacity of only 453 kilograms (1,000 lbs). Weasels were used to ferry men and supplies around the flooded quagmire of Walcheren Island during Operation Infatuate in November 1944, but were also used elsewhere in North West Europe in 1944-45 and in the Pacific Theatre, such as the US Marines' invasion of Iwo Jima in February 1945. The Weasel was used in a variety of roles, from cargo carrier to battlefield ambulance. Although modified to be amphibious through the addition of large side-mounted floats and twin rudders, the M29C Weasel could only really be used in calm water. A capstan on the front of the Weasel powered by the engine was used to wind an anchor to help the vehicle extricate itself if stuck. The Weasel had a crew of one, was unarmed, and had a top speed of 58 km/h (36 mph) on land and 6.5 km/h (4 mph) in the water. This Weasel was donated to the Tank Museum in 1951. |
The Road into Germany
 |
| Some of the armoured vehicles that saw service in the the final push into Germany in the spring of 1945, including Operations Plunder and Veritable, and the Battle of the Bulge. |
 |
| A Centaur assault bulldozer, adapted from the hull of the unsuccessful Centaur cruiser tank. Intended to replace earlier assault bulldozers that were not fast enough to keep up with the speed of the Allied advance, only 250 Centaur dozers were built and they only entered service weeks before the end of the war. The 87th Assault Squadron was equipped with 36 Centaur dozers, whose combat debut was in the capture of Bremen, Germany on 26-28 April 1945. They were used to clear roadblocks and rubble, as well as fill craters preventing the passage of vehicles. The Centaur bulldozer weighed 26.7 tonnes, had a crew of two, and a top speed of 43 km/h (27 mph). It featured 63mm (2.5 inches) of armour and was unarmed. This vehicle was originally built as a Centaur tank and later converted into a dozer by MG Cars; its service history is unknown, but it was retired in 1963, sold for scrap in 1968, subsequently recovered and restored, and donated to the Tank Museum in 1985. |
 |
| A Ram Kangaroo armoured personnel carrier, developed from the hull of the Canadian-designed Ram tank. While the first Kangaroos were based on surplus M7 Priest self-propelled artillery pieces with their guns removed, by October 1944 the M7s were worn out and the decision was taken to convert Ram tanks into Kangaroos. The Ram Kangaroos equipped the 1st Canadian Armoured Personnel Carrier Regiment and an equivalent British regiment, with both units ferrying many different infantry battalions into various battles up until the end of the war. The Ram Kangaroo's 76mm (3 inch) armour protected infantrymen crouched inside and its ability to traverse difficult terrain meant that the infantry arrived at the scene of battle ready to fight and not tired from a long march. The Kangaroos proved so popular that they were in constant demand in 1945. Note the chalk number (C/55) scrawled on the hull: this was done to identify which infantry unit should board which Kangaroo for the journey to the battlefront. |
 |
| A rear view of the Ram Kangaroo armoured personnel carrier, of which 500 were converted from Canadian-built Ram tanks. The vehicle weighed 24.5 tonnes, had a top speed of 40 km/h (25 mph), and was operated by a crew of two, with space for 8-10 infantrymen as passengers. For self-defence, it carried one .30-inch M1919 machine gun. Because the Kangaroo was based on a tank rather than being built from scratch as a personnel carrier, infantrymen had to climb over the top of the hull to get in or out of the vehicle and there was no overhead protection where the turret was removed. This Ram Kangaroo was converted from an early Ram tank, built in 1942, though its wartime service record as a Kangaroo is unknown. It was used as a target on a firing range on Salisbury Plain until recovered by a team from the 4th Royal Tank Regiment. It was subsequently restored by a team from 27 District Workshop of the British Army's Royal Electrical and Mechanical Engineers (REME) and donated to the Tank Museum in 1985. |
 |
| A Valentine Archer self-propelled gun, designed to meet a requirement for a vehicle capable of mounting the 17-pounder anti-tank gun. The hulls of obsolete Valentine tanks were used for this conversion, but the gun had to be mounted facing the rear of the hull. Eventually, 667 Archers were built. The Archer began replacing M10 Achilles tank destroyers and towed anti-tank guns in the Royal Artillery's anti-tank batteries from the autumn of 1944. The rearward facing gun of the Archer was beneficial for defensive fighting, but less so when the Allied armies were making rapid advances in Northwest Europe in 1944-45. As such, the Archer was used more frequently in support of infantry than as a tank killer, as fire support to infantry meant the vehicle was stationary for longer periods of time. The Valentine Archer had a crew of four, weighed 16.8 tonnes, had a top speed of 34 km/h (21 mph), and was protected by 20mm (0.79 inches) of frontal armour. This Archer is believed to have been built in the first half of 1945 and its service history is unknown; it was donated to the Tank Museum in 1969. |
 |
| An M24 Chaffee light tank, developed to replace the obsolete M5 Stuart light tank. The Chaffee entered service with the US Army in the winter of 1944, and was used by cavalry reconnaissance squadrons leading the push into Germany in 1945: the M24s provided fire support to the jeeps and armoured cars of these squadrons. The Chaffee used the same engine and transmission as the Stuart, but was given improved torsion bar suspension for better mobility and the more powerful 75mm M6 gun. The British Army was also provided a small number of Chaffee tanks in April 1944, which saw little action before the end of the war. The Chaffee proved to be popular and 4,731 were built, with many being exported around the world and some remaining in service until the 1990s. The M24 Chaffee had a crew of five, weighed 18.4 tonnes, and had a top speed of 56 km/h (35 mph). It was protected by 38mm (1.5 inches) of frontal armour and, in addition to its 75mm gun, was armed with one .50-inch M2 machine gun and two .30-inch M1919 machine guns. This Chaffee was one of those used by the British Army and was transferred to the Tank Museum in 1951. |
 |
| A German Jagdpanzer 38(t) Hetzer tank destroyer, one of 2,612 built. Developed in early 1944 by Böhmisch-Mährische Maschinenfabrik in German-occupied Czechoslovakia, the Jagdpanzer 38(t) was based on the hull of the Czech LT vz.38 tank, which had been adopted by the German Army as the Panzer 38(t). Whilst its small size and low height made it easy to conceal the Hetzer in effective ambush positions, it was cramped for its four-man crew and, as such, difficult to operate easily. Hetzers were assigned to the anti-tank companies of German infantry divisions which otherwise had few vehicles and therefore suffered from limited mobility. By the end of the war, supply chain problems meant that Hetzer mechanics struggled to keep sufficient numbers operational, often cannibalising parts from irreparably damaged vehicles to keep others running. |
 |
| A rear view of the Jagdpanzer 38(t) Hetzer. It weighed 16 tonnes, had a top speed of 40 km/h (25 mph), and 60mm (2.4 inches) of frontal armour protection. The Hetzer's anti-tank armament consisted of a 75mm PaK 39 gun, with self-defence provided by one 7.92mm MG34 machine gun. The six large holes in the idler wheels at the rear of the Hetzer reveal that this vehicle was built in late 1944, as early models had 12 smaller holes; this was changed to ease manufacture. Of note, the 'Hetzer' name was not commonly used during the vehicle's wartime service but is commonly used to identify the vehicle today. The Jagdpanzer 38(t) on display came to the Tank Museum in 1951 as part of a large consignment of captured German vehicles. |
 |
| A display of various types of tank guns and information on the types of rounds (e.g. armour piercing, high explosive, smoke) fired from them, depending on the target. Each gun has a calibre (the diameter of the hole at the end of the barrel) usually expressed in millimeters and an 'L' value which denotes the length of the barrel; you can calculate the length of the barrel by multiplying the 'L' value by the calibre. Longer guns impart more energy to a projectile, therefore providing a longer range, more accurate targeting, and better ability to penetrate thicker armour. Most guns are now identified by their calibre, but the British for many years identified the type of gun by the weight of its ammunition, for example 6-pounder, 17-pounder, etc. |
 |
| A German Sd Kfz 173 Jagdpanther tank destroyer. Developed late in the war, only 413 Jagdpanthers were built, using the hull of the Panther tank paired with the deadly 88mm gun in a fixed casemate. Jagdpanthers were deployed in Heavy Panzerjäger Battalions to both the eastern and western fronts from mid-1944 and proved very successful in the defensive battles of 1945, inflicting significant losses on Allied forces advancing into Germany. Nevertheless, Allied bombing of Jagdpanther factories severely limited production of the vehicle. In combat, the Jagdpanther was lethal against Allied tanks, especially when camouflaged and directly facing the enemy; however, if outmanoeuvred and attacked from the side or rear where its armour was thinner, the Jagdpanther was vulnerable. More than from enemy fire, most Jagdpanthers were destroyed by their own crews after the vehicles became immobilised and could not retreat or be recovered from the battlefield. Fuel and spare parts shortages, or non-lethal but immobilising damage to tracks or gear units caused by enemy artillery fire were often reasons why Jagdpanther crews were forced to abandon and blow up their own vehicles. The Jagdpanther had a crew of five, weighed 46 tonnes, and had a top speed of 46 km/h (28.5 mph). Protected by 100mm (3.9 inches) of frontal armour, the Jagdpanther was armed with an 88mm PaK 43/3 gun and one 7.92mm MG34 machine gun. This Jagdpanther was built by Maschinenfabrik Niedersachsen Hannover after the end of the war, when British forces occupied the factory and directed the German workforce to complete a number of unfinished Panther tanks and Jagdpanthers under British supervision. The vehicle was used for testing and evaluation purposes by the British before being donated to the Tank Museum in 1951. |
The Battle of Berlin
 |
| A Soviet T-34/85 tank, developed in 1943 in response to the shortcomings of the T-34/76 against newer German tanks being encountered on the battlefield. The Soviet regime had steadfastly refused to make any improvements to the T-34/76 in order to avoid production delays or stoppages due to the need to retool the factories. The T-34/85 featured a larger, three-man turret housing a much more powerful gun, but the rest of the tank remained largely the same as the T-34/76. Of the 58,700 T-34s manufactured, 23,213 were of the T-34/85 variant. For the advance into Germany from the east, Soviet forces deployed thousands of T-34s that overwhelmed the German defences, notwithstanding significant losses of Soviet troops and armour along the way. The T-34/85 had a crew of five, weighed 32 tonnes, and had a top speed of 55 km/h (34 mph). It featured 90mm (3.5 inches) of frontal armour and was armed with an 85mm ZiS-53 gun and two 7.62mm DT machine guns. This T-34/85 was built at Factory 112 in Gorki in late 1944 and sent to North Korea where it was used in the Korean War (1950-53). It was captured by UN forces sometime before November 1950 and was donated to the Tank Museum in 1952. |
 |
| A Truppenfahrrad (troop bicycle) M42 used by Wehrmacht soldiers throughout the war. Despite the image of the mechanised German blitzkrieg sweeping through Europe, most German army units were not mechanised and relied on marching, horse transport, or bicycles to get around. The M42 was the standard issue bicycle for army and Waffen SS troops during the war and could be fitted with a toolbox and a porter rack on the rear to carry the rider's equipment. Fittings on the steering bar could be used to carry a variety of items, including the single-shot Panzerfaust anti-tank weapon. With Allied forces advancing into Germany from both east and west in 1945, German soldiers used the M42 Truppenfahrrad to quietly and quickly approach and ambush Allied tanks using Panzerfausts before escaping. This M42 was built in 1943. The box on the bicycle's crossbar could hold tools or three stick grenades or one box of MG42 machine gun ammunition. |
 |
| A German Panzerfaust. First issued to German troops in August 1943, the Panzerfaust was a single shot, shoulder-fired recoilless, disposable short-range anti-tank weapon that fired a hollow charge projectile. After being ejected out of the firing tube, folding stabiliser fins on the charge would spring up and help guide the charge to its target. Upon impact with a tank, a jet of molten metal generated by the charge's firing would penetrate the armour and wreak havoc inside the tank. The Panzerfaust's charge could penetrate up to 200mm (7.8 inches) of armour. Early Panzerfausts had a range of 30 metres (98 feet), increasing to 60 metres (197 feet) for the model introduced in September 1944. In the desperate final weeks of Nazi Germany's existence, with the Allies closing in on Berlin from all directions, Panzerfausts were issued widely, including to civilians and Hitler Youth members, to undertake last-ditch attacks against Allied tanks. The Panzerfausts were cheap and easy to manufacture and could be successfully deployed by personnel with minimal training. |
 |
| A bronze bust of Hermann Göring, Nazi politician and Commander-in-chief of the Luftwaffe, recovered after the collapse of the Nazi regime. There are competing accounts of how it was captured. One account claims the bust was captured in the officers' mess of the barracks in the German town of Kladow and the bullet holes in the nose and cheek were made by a drunken Russian soldier on the eve of the turnover of the barracks to British forces. Another account says the bust was captured at a former Luftwaffe camp in the town of Detmold by a member of the British Army's 1st Royal Tank Regiment and that the bullet holes were, according to a German officer, caused by American soldiers. |
 |
| A Mark I Centurion / A41 medium tank. At the direction of Prime Minister Winston Churchill, development of new tank models was suspended at the outset of the Second World War to avoid production delays and ensure the continued supply of proven models to the fighting forces. As a result, British armoured units were forced to use many outdated tanks well into the war and Britain fell behind other nations in tank design. Nevertheless, the government-sponsored Department of Tank Design absorbed the lessons learned from tank warfare and in 1943-44 was charged with creating a reliable tank with 'maximum efficiency under all conditions of terrain, temperature, and sustained action'. As the war neared its end, the Centurion prototype made its debut, with six Centurion prototypes being sent to northwestern Europe on 19 May 1945 for two months of testing. The Centurion became one of the most successful tanks ever designed, with a good balance of mobility, firepower, and protection and plenty of margin for technological upgrades over time. Eventually, 24 marks and sub-marks of the Centurion would be produced for Britain alone, with the Centurion also being exported to 19 other nations. In total, 4,423 Centurion tanks of all variants would be built between 1946 and 1962. The Mark I Centurion had a crew of four, weighed 46.3 tonnes, and its 600-horsepower engine gave a top speed of 37 km/h (23 mph). It was protected by 152mm (6 inches) of frontal armour and armed with a 17-pounder gun and one 20mm Polsten cannon. This Centurion, with serial number T-352416, was one of the first Centurons built. |
 |
| A rare Sd Kfz 186 Jagdtiger tank destroyer, the most heavily armed and armoured vehicle employed during the Second World War. A slow rate of production resulting from the Allied bombing of German factories and the scarcity of resources meant that Jagdtigers were deployed to the battlefront in small groups, sometimes as few as five or six vehicles at a time. Only 85 Jagdtigers were built before the collapse of Nazi Germany and, while they scored numerous kills against Allied armoured vehicles, there were too few in service to have any meaningful impact. With 200mm (7.9 inches) of frontal armour, the Jagdtiger was impervious to any Allied gun and its 128mm PaK 44 gun could knock out Allied tanks at ranges of well over one mile (1.6 kilometre). Despite its massive weight of 75 tonnes, the Jagdtiger used the same engine and transmission system as the Tiger I and Tiger II tanks, leading to many breakdowns. As a result, many immobilised Jagdtigers had to be abandoned and destroyed by their own crews in the face of advancing Allied forces. |
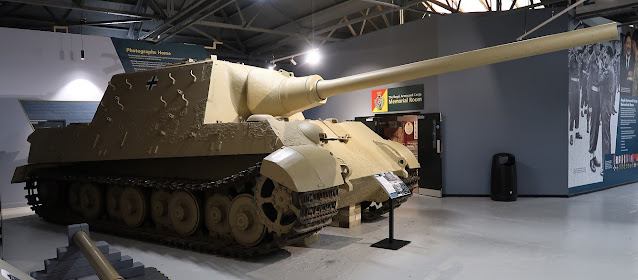 |
The Jagdtiger had a crew of six and a top speed of 20km/h (12 mph). In addition to its 128mm PaK 44 gun, it was equipped with one 7.92mm MG34 machine gun for self-defence. This Jagdtiger was built in July 1944 and was one of only 11 to be built with the Porsche suspension system, involving two-wheeled bolt-on units that could be easily replaced. The Porsche suspension system was a failure and the remaining 74 Jagdtigers that were built featured the Henschel suspension used on the Tiger II tank. This Jagdtiger never saw combat and was instead used as a trials vehicle at the Sennelager testing ground. When Sennelager was overrun and captured by British forces in early April 1945, this Jagdtiger was captured intact and used for testing in Germany and the UK. It was transferred to the Tank Museum in 1952.. |
Tank Factory Gallery
 |
| This gallery is devoted to explaining the design and manufacture of tanks and resembles the production floor of a tank factory, with three different variants of the Centurion tank occupying the centre of of the gallery in a mock assembly line. The Centurion at the front is a upgraded Swedish Centurion Stridsvagn 104c. Four factories built Centurions: Leyland Motors, the Royal Ordnance Factory (ROF) Barnbow, Vickers Elswick, and the ROF Woolwich. Converted from a gun factory to a Centurion manufacturing facility in 1945, in the 1950s ROF Barnbow covered 63 acres, had a 3.75-mile long production shop, and manufactured around 20,000 components in-house while receiving another 10,000 components from outside firms. As the UK's most successful post-war tank export, the Centurion was operated by 19 foreign countries, including Australia, Canada, India, Iraq, Israel, Jordan, New Zealand, Singapore, South Africa, Sweden, and Switzerland. The Centurion was also adapted into a variety of specialist armoured vehicles, including engineer vehicles, armoured recovery vehicles, and bridge-layers. |
 |
| A display on the testing of tanks and the design of tank turrets. As the display notes, during the early stages of the Second World War, the desperate need for tanks meant that vehicles riddled with design and mechanical faults were rushed straight into combat, often with unfortunate consequences; the Covenanter tank was so poorly designed it was never accepted for combat duty. Today, new tanks are subjected to months of detailed testing and trials before being approved for service with armoured regiments. Crammed with equipment and ammunition, tanks do not permit much space for their crews. While the British Army has never specified the size of crewmen for tanks, the Soviet Army preferred smaller men for duty in tanks. |
 |
| A Soviet T-55 tank used for training crewmen, with some wheels removed and holes cut into the hull and turret to assist in technical instruction. The T-55 entered service in 1958 and, although similar in outward appearance to the preceding T-54, introduced a range of new features, including anti-nuclear equipment, greater ammunition stowage space, and a 100mm rifled gun. When production ceased in 1979, 27,500 T-55s had been built in the Soviet Union, with another 10,000 built in Poland and Czechoslovakia. Although the hull of the T-55 was comprised of flat armoured plate welded together, the turret, nicknamed the inverted frying pan, was cast from a single block of steel. The turret's small size made for cramped conditions for the commander, gunner, and loader who worked inside it, but was a deliberate choice to give the T-55 a low and inconspicuous profile. Although the T-55 is cramped, lacks modern fire control equipment and suffers from limited ammunition stowage, it remains in service with a number of countries in the developing world. The T-55 had a crew of four, weighed 36 tonnes, and its 580-horsepower diesel engine gave it a top speed of 50 km/h (31 mph). Protected by 205mm (8 inches) of frontal armour, the T-55 sported one 7.62mm coaxial machine gun in addition to its 100mm main gun. Of note, the Tank Museum's T-55 has false thickened armour on the turret, used to give Soviet tank crew trainees greater confidence in the vehicles in which they would serve. |
 |
| The Advanced Composite Armoured Vehicle Platform (ACAVP), a research demonstrator vehicle built by the UK's Defence Evaluation and Research Agency (DERA) in 2000. It was nicknamed the 'Plastic Tank' and the 'Tupperware Tank'. The ACAVP's hull is made from a composite of fibreglass and resin and was designed to be lighter than aluminium but with the same defensive capability against the kinetic energy of a projectile. Beyond its lighter weight, it was intended that composite armour would avoid the lethal splintering inside the vehicle experienced when metal armour is hit by high kinetic energy rounds. The ACAVP's composite monocoque hull was manufactured using a process called soft-sided resin transfer moulding, which creates a durable skin without thick conventional armour. In addition to its lighter weight, the hull incorporates stealth characteristics. The engine, transmission, and tracks of the ACAVP are those of a FV500 series Warrior armoured vehicle, with the Perkins CV-8 diesel engine mounted at the rear. the turret is from an FV721 Fox vehicle, mounting a 30mm Rarden cannon. With a crew of three and weighing 24 tonnes, the ACAVP was used to demonstrate and evaluate the effectiveness and durability of its composite armour and was donated to the Tank Museum in 2011. Defence scientists continue to check up on the vehicle to assess how its fibreglass and resin armour is ageing in order to determine if plastic armoured vehicles will be a viable option in the future. |
 |
| A Swedish Stridsvagn 103 S-Tank. Designed by Sven Berge of the Swedish Arms Administration, the S-Tank had an exceptionally low profile in order to be able to more effectively hide in hull-down defensive positions with little of the vehicle exposed to enemy fire. The only way to achieve such a low profile was to eliminate the turret and to fit the gun inside the vehicle's hull. To aim the gun, the entire vehicle had to pivot on its tracks. The angle of the gun could be elevated or depressed by raising or lowering the vehicle's suspension. The S-Tank could fire 15 rounds per minute with extreme accuracy. A mechanical auto-loader eliminated one crew position and the vehicle was designed to be operated by two crewmen, a commander/driver and a gunner. A third position was soon added for a radio operator. Both the commander and the gunner had driving controls so they could swap responsibilities if required, while the rearward-facing radio operator also had driving controls so that he could quickly drive the S-Tank backwards in an emergency. Built by Swedish company Bofors AG, the first S-Tank entered service in 1960 but none ever saw use in combat; as such, the battlefield effectiveness of the S-Tank was never proven. Sweden decommissioned its S-Tanks by 1979 when it adopted the German-designed Leopard 2 tank. The S-Tank weighed 42.5 tonnes, had a top speed of 60 km/h (37 mph), and frontal armour of 40mm (1.6 inches) thickness. It was armed with a 105mm gun and two 7.62mm hull-mounted machine guns. The vertical grill on the front of the S-Tank is a protective barrier against High Explosive Anti-Tank (HEAT) rounds. |
\
 |
| The hull of a Mark 12 Centurion tank with its turret suspended from an overhead gantry by chains. It is wearing a coat of red oxide paint, a standard step to seal the metal prior to the application of a base coat of paint. Each Centurion took about four months to complete and cost around £20,000 in the 1950s. Each completed Centurion turret contained about 1,000 feet (305 metres) of electrical cabling, nearly equivalent to the length of three football pitches. |
 |
| A lineup of the family of Combat Vehicle Reconnaissance (Tracked), or CVR(T). The CVR(T) family was developed by British company Alvis in the 1960s as replacements for its Saladin armoured car. The CVR(T) comprised the Scorpion and Scimitar light reconnaissance tanks, the Spartan armoured personnel carrier, the Sultan command and control vehicle, the Samaritan armoured ambulance, the Striker anti-tank guided missile vehicle, and the Samson armoured recovery vehicle. The CVR(T) vehicles featured weight-saving aluminium armour and shared the same automotive and suspension components for ease of repair and training. |
 |
| The FV101 Scorpion, the first fully tracked reconnaissance vehicle to enter British Army service since the light tanks of the 1930s. In 1973, the Blues and Royals of the Household Cavalry were the first unit to be equipped with the Scorpion, which featured a hull and turret made from welded aluminium, a 76mm low velocity main gun, a coaxial 7.62mm General Purpose Machine Gun, and a Jaguar XKJ60 4.2 litre petrol engine. Its small size made the Scorpion air portable by C-130 Hercules aircraft or Chinook heavy lift helicopter, and it was also amphibious through the use of a collapsible screen that made it buoyant. The remaining Scorpions were later refitted with turrets from the Fox armoured reconnaissance vehicle and 30mm Rarden cannons and renamed the Sabre. Scorpions saw combat service in the Falklands War (1982) and the First Gulf War (1990-91) before being withdrawn from British Army service in 1995, with the Sabres decommissioned in 2004. |
 |
| An FV107 Scimitar. With the same hull and turret as the Scorpion, the only difference is that the Scimitar mounts the 30mm Rarden cannon as its main armament, with onboard stowage for 201 30mm rounds. Originally intended to be the anti-aircraft member of the CVR(T) family of vehicles, the 30mm Rarden cannon was found to be an effective weapon against most light armoured vehicles and even main battle tanks if attacking the more thinly-armoured sides or rear. With a crew of three (commander, driver, gunner), the Scimitar's original J60 4.2 litre petrol engine was eventually replaced by a Cummins diesel engine as part of the 1988 CVR(T) Life Extension Programme. The Scimitar has a torsion bar suspension system, with manganese tracks fitted with rubber pads. The vehicle equipped reconnaissance regiments of the Royal Armoured Corps. |
 |
| An FV103 Spartan, the armoured personnel carrier variant of the CVR(T) family. In addition to its three-man crew (commander, driver, radio operator), the Spartan can carry four soldiers in the rear compartment who can exit through a rear door or an overhead hatch to fight dismounted. Originally, these troops would have been Assault Troops, part of the Support Group of a Royal Armoured Corps (RAC) reconnaissance regiment. With the disbanding of the Assault Troops within the RAC, the Spartans now carry specialised teams of Royal Engineer demolition experts, mortar crews, and other similar groups. In the 1980s, the Spartan was often equipped with the Marconi ZB298 radar used for battlefield surveillance and target acquisition or as a carrier for light anti-tank weapsons, such as the Blowpipe. In more recent years, Spartans have been used for driver training in the ranges around Bovington. Like the other CVR(T) vehicles, the Spartan was originally designed to be amphibious, with a collapsible screen to provide buoyancy and with the tracks acting as paddles; however, this equipment has now been removed from the remaining Spartan fleet. |
 |
| One of 50 FV104 Samaritan armoured ambulances built for the British Army as part of the CVR(T) programme. Similar in appearance to the Sultan command and control variant, the Samaritan has space for two stretcher cases and four seated patients along with the two-man crew (driver and commander/medical orderly). As an ambulance, the Samaritan does not carry any weapons but is equipped with two clusters of smoke dischargers on the front of the hull to conceal it on the battlefield. On active service, the Samaritan's crew would be supplemented by an additional medical orderly at the expense of being able to carry one less seated patient. The Samaritan fleet was upgraded as part of the CVR(T) Life Extension Programme in 1988, which included the replacement of the original Jaguar petrol engine with the Cummins diesel engine. |
 |
| A Mark III A13 Covenanter cruiser tank, considered one of the worst British tanks ever built. With Britain desperate for tanks early in the Second World War, the Covenanter suffered from several design faults: although it had been intended to use lightweight cast aluminium wheels, the wartime allocation of all aluminium to the Royal Air Force for aircraft construction meant that the Covenanter was forced to use pressed steel wheels, which made the tank as heavy as its suspension system could bear; and the use of a Meadows flat-twelve cylinder engine left no room at the rear of the tank for the radiators, so these were fitted at the front where a tank's machine gunner would normally sit. Although the Covenanter had a low silhouette and a good top speed of 50 km/h (31 mph), it was mechanically unreliable and none of the 1,200 Covenanters built were ever accepted for combat service. The Covenanters that were produced were used in the UK for training or were converted into observation post vehicles for Royal Artillery batteries or as bridge-layers in 1944-45. |
 |
| Designed and built by the London, Midland & Scottish Railway, the Covenanter had a crew of four, 40mm (1.6 inches) of frontal armour, and weighed 18 tonnes. It was armed with one two-pounder gun and one 7.92mm BESA machine gun. The Tank Museum's Covenanter was discovered buried deep under a farmer's field near Dorking, in the southeastern English county of Surrey in 1977 and subsequently excavated and restored. |
 |
| The M4A1 Sherman tank 'Michael', the second production model of the famous M4A1 Sherman tank and the oldest surviving Sherman in the world. 'Michael' was built by the Lima Locomotive Works in Ohio, USA in 1942 and, after being shipped to the UK, was displayed on Horse Guards Parade in London for a time so that the British public could see the new tank design. The tank's hull was made by General Steel Company from a single steel casting and was one of the the largest single castings made in the United States up to that time. Compared to a traditional rivetted hull, the cast steel hull was $3,000 cheaper to manufacture. Eventually, 50,000 Sherman tanks of various marks were built for use by the Alies. The Sherman's tall profile was due to the upright mounting of its Wright Continental R975 engine. The M4A1 Sherman had a crew of five, a top speed of 39 km/h (24 mph), and weighed 30.3 tonnes. It was armed with one 75mm main gun and four .30-inch machine guns, and was protected by 76mm of frontal armour. |
 |
| A Mark 13 Centurion, originally built as a Mark 8, subsequently uparmoured and upgunned to Mark 10 configuration, and then fitted with infrared ranging equipment and 105mm L7A1 gun to become a Mark 13. The Centurion Mark 13 had a crew of four, 152mm (6 inches) of frontal armour, and weighed 51.7 tonnes. Powered by a 650-horsepower Rolls-Royce Meteor Mark VIB petrol engine, the Centurion had a top speed of 34 km/h (21 mph). This tank was the last gun tank Centurion to fire in British Army service, though a small number of Centurion-based Beach Armoured Recovery Vehicles (BARV) were used by British forces as late as the Iraq war of 2003, 58 years after the Centurion's introduction to service. |
 |
A cutaway Centurion tank showing the inside compartments and crew positions. Originally built as a Centurion Mark 2 with a 17-pounder gun, the tank was converted to a Mark 3 configuration and later converted again into a Mark 5. Withdrawn from British Army service and placed in storage, the tank deteriorated over time until restored between 1982 and 1984 as part of an apprentice training programme at the Royal Ordnance Factory in Leeds. Returned to Mark 3 configuration, the tank was then cut in half to display the interior to visitors. Shown here are the commander's and gunner's positions.
|
 |
| The loader, responsible for loading the shells into the 20-pounder gun. The QF (Quick-Firing) 20-pounder (84mm) gun was introduced in 1948 and equipped the Centurion, the Charioteer medium tank, and the Caernarvon Mark II heavy tank. It was soon replaced by the 105mm L7 gun, which was found to be more effective against the Soviet T-54 tank. |
 |
| Another view inside the cramped turret of the Centurion Mark 3. |
 |
| A number of main battle tanks in the Cold War Hall line the edge of the seating area for the Tank Museum Café. In the centre, the sand-coloured Challenger 1 was originally designed by the UK's Royal Ordnance for the government of Iran but, when the purchase was cancelled by the fundamentalist Islamic regime that overthrew the Shah in 1979, the British Army bought the tank, naming it Challenger. Eventually, 420 Challenger 1's would serve in the British Army between 1983 and 2001, being replaced by the Challenger 2. Upgraded Challenger 1s still serve in the Royal Jordanian Army. |
 |
| Looking over the Cold War Hall from a raised platform. The tank in the foreground is a Chieftain Mark 12 main battle tank, while the sand-coloured tanks to its left are a Challenger 1 main battle tank and a Khalid main battle tank. The Khalid is an improved version of the Chieftain originally designed for pre-Islamic Revolution Iran as the Shir 1 and subsequently sold to Jordan as the Khalid. |
 |
| The A39 Tortoise heavy assault tank. From 1943, seventeen designs for a turreted heavy assault tank were developed in response to a perceived requirement to tackle anticipated strong German border defences. One of these designs was eventually selected and six prototypes were built; however they were not ready until 1947 and thus missed the war. Two Tortoises were shipped to Germany in 1948 for testing, but the vehicle's size and weight made it difficult to transport and damaged roads and bridges. Notwithstanding the gun's excellent accuracy, the Tortoise's slow speed and poor ammunition stowage and handling arrangements were criticised and the vehicle was never accepted for service. The Tortoise's large gun, adapted from the successful 3.7-inch (94mm) anti-aircraft gun, was installed on a large, gimbal-like ball-mounting and would have been powerful enough to knock out the most heavily-armoured German tanks during the war and post-war Soviet tanks of the 1950s. The weight of the gun's ammunition required the shell and the propellant charge to be loaded separately, though even with this arrangement, the work was tiring for the tank's loader. |
 |
| The Tank Museum's M4A2E8 Sherman tank was used in the 2014 film 'Fury' in scenes where it was depicted fighting the museum's famous German Panzerkampfwagen VI Tiger 131. The 'Fury' Sherman clocked just under 100 miles (161 km) of driving for the filmed sequences and has been maintained in the markings and with the props applied by the filmmakers. This M4A2E8 Sherman was manufactured by the Fischer Tank Arsenal in Michigan, USA and was one of 294 purchased by Canada in 1946. It was used as a teaching aid at the Royal Military College of Science at Shrivenham before being donated to the Tank Museum in 1985. |
 |
| Although the Sherman had thinner armour, a less powerful gun, and was even slower on the battlefield than the German Tiger I, it was more mechanically reliable and produced in such huge quantities that losses could be easily replaced by fresh Shermans. Sherman crewman learned how to effectively use their 'good enough' tank against German opponents and the Sherman evolved during the war to incorporate improvements, such as the 76mm gun, better suspension, and wider tracks. The M4A2E8 Sherman had a crew of five, a top speed of 48 km/h (30 mph), and weighed 33.3 tonnes. With 560 litres (123.2 gallons) of fuel, it had a range of 162 kilometres (100 miles). The M4A2E8 was protected by 63.5mm (2.5 inches) of frontal armour and armed with a 76mm M1A2 main gun, one .50-inch M2 machine gun, and two M1919 machine guns. |
 |
| The entrance to the Battlegroup Afghanistan gallery, devoted to British forces' service in Afghanistan between 2003 and 2014. The gallery is built to resemble a British Forward Operating Base ringed with a Hesco barrier comprising a wire mesh container fitted with a heavy duty fabric liner and filled with sand or gravel to provide protection against small arms fire and explosives. Various vehicles actually used by the British Army in Afghanistan are displayed. |
 |
| A Jackal wheeled armoured patrol vehicle, designed by British company Supacat and built by Babcock. The Jackal is used by the British Army for deep battlespace reconnaissance, rapid assault, fire support, and convoy protection, and is also used by the Royal Air Force Regiment for airfield defence. The vehicle features good mobility, endurance, and manoeuvrability, with a top speed of 130 km/h (80 mph) and the ability to maintain an off-road speed of 79 km/h (49 mph). Crewed by three soldiers, the Jackal can carry a variety of weapons, including a 12.7mm heavy machine gun, 7.62mm general purpose machine gun, or a 40mm automatic grenade launcher. This Jackal was reconstructed by Babcock from two combat-damaged vehicles and donated by the Ministry of Defence for this exhibit. |
 |
| A quad bike and trailer sits in the middle of the Battlegroup Afghanistan exhibit, with a Viking BvS 10 all-terrain vehicle in the background. |
 |
| The damaged front axle from a British Army Mastiff 6x6 protected patrol vehicle that drove over an Improvised Explosive Device in Afghanistan. The Mastiff, the British variant of the American-designed Cougar, which stands 3.2 metres (10.5 feet) tall and is almost as long as a London double decker bus, can sustain significant damage from landmines and Improvised Explosive Devices and can be repaired either in theatre or in the UK. The first British Army Mastiffs arrived in Afghanistan in December 2006, with an improved Mastiff 2 vehicle arriving in June 2009. The Mastiff can mount either a 12.7mm heavy machine gun, 7.62mm general purpose machine gun, or a 40mm automatic grenade launcher. This axle was donated to the Tank Museum by NP Aerospace, the British company responsible for integrating electronics and installing the British Army standard armour package on the American-built vehicles. |
 |
| The versatile BvS 10 articulated, amphibious, tracked all-terrain vehicle, used as a troop carrier, weapons platform, recovery vehicle, and ambulance. Originally designed for the UK's Royal Marines through a teaming arrangement between the Ministry of Defence and Hägglunds Vehicle AB, the BvS 10 is now manufactured by BAE Systems Land Systems Hägglunds of Sweden. With its 5.9-litre turbocharged Cummins diesel engine, the BvS 10 can achieve a top speed of 70 km/h (43 mph) on-road and 5 km/h (3.1 mph) in water. It can carry loads up to five tons, has a range of up to 500 kilometres (310 miles), and can be fitted with a variety of modular sub-systems, including weapon mounts, add-on armour, and cargo platforms. The Royal Marines procured 108 BvS 10s, known as Viking in British service, in 2005 and the vehicle was first used operationally in Afghanistan in September 2006. The Netherlands Marine Corps and the Austrian, French, and Swedish armies are also users of the BvS 10, with the US Department of Defense announcing the purchase of 163 vehicles in 2022 for the US Army Cold Weather All-Terrain Vehicle program. The BvS 10 is air-portable and can be slung under a CH-47 Chinook heavy lift helicopter. This BvS 10, fitted with slat armour like those deployed to Afghanistan, was a prototype previously used for training and has been loaned to the Tank Museum by the Royal Marines Armoured Support Group. |
 |
| A prototype Panther Command and Liaison Vehicle (CLV), a four-wheel drive tactical vehicle built by Italian company Iveco as the Lince (Lynx) Light Multirole Vehicle. The British Army procured 401 Panther CLVs, most license-built by BAE Land Systems in Newcastle, between 2006 and 2009 for the Future Command and Liaison Vehicle project. The Panther variant carries a driver and three passengers, has a top speed of over 130 km/h (81 mph), and a range of up to 500 kilometres (310 miles). It can be fitted with various weapons, including a 7.62mm general purpose machine gun, a 12.7mm heavy machine gun, or a 40mm automatic grenade launcher. In April 2018, the UK Ministry of Defence put the entire remaining fleet of 395 Panthers up for sale. Iveco has sold over 4,000 of the vehicle to 19 nations which continue to use them. The Lince has seen operational service in the Afghanistan war and with Ukrainian forces during the Russian invasion of 2022. This vehicle, donated to the Tank Museum by BAE Systems, was destroyed during mine-blast testing in an effort to better understand the effects of explosions and design improvements. |
 |
| A Multi-Terrain Pattern (MTP) uniform adopted by British forces in March 2010 as a consequence of operations in Afghanistan, where soldiers moved through different environments during the day. With seven colours rather than the four used in previous camouflage uniform designs, the MTP camouflage provides better cover for troops moving from arid desert terrain into the green vegetated areas along the Helmand River. The MTP uniform was the first change to British Army camouflage in 40 years. Using a layered approach, the modern British Army combat uniform is both lightweight and durable, and can be adjusted to provide the most effective protection and warmth for soldiers, depending on their operating environment. |
 |
| The largest single gallery at the Tank Museum is 'The Tank Story', dedicated to tracing the origins of the tank from 1915 to the present day. Here, in this soaring, cavernous exhibit hall, 35 historically important armoured vehicles showcase the development of the tank over more than a century and recount significant events in the history of armoured warfare. Seen below are some of the first tanks from the First World War period. |
 |
| An overhead view of 'Little Willie', the first real tank, developed in 1915, and some of the other early tanks and armoured cars that are displayed at the beginning of 'The Tank Story' exhibit. |
 |
| Little Willie is unique, as only one of its type was constructed by the British agricultural equipment firm of William Foster & Company from a design by William Tritton and Walter Wilson. It was a proof of concept vehicle commissioned by the British Admiralty's Landships Committee in 1915 to demonstrate that a tracked vehicle with an internal combustion engine and armour protection was feasible for the battlefield. The name was inspired by a pejorative nickname given to German Crown Prince Wilhelm by British newspapers in 1915. Little Willie carried a crew of five men, weighed 16 tons, had a top speed of 5.6 km/h (3.5 mph), and 10mm (0.39 inches) of armour protection. Although Tritton and Wilson had already drawn up a more advanced tank design by the time Little Willie was built, the vehicle's revolutionary tracks, which included flanges on rails that kept the tracks from sagging and falling off when crossing trenches, proved the potential of the tracked armoured vehicle and ensured continued funding for tank development. |
 |
| Large pieces of metal from the side cabin of the tank 'D6', a Male tank that participated in the world's first armoured attack on 15 September 1916 during the Battle of the Somme. D6 advanced further on the battlefield than any other tank that day but was hit by German artillery and caught fire, killing or injuring all of its crew. Over 70 years after the battle, these rusted metal fragments from D6 were recovered from a hedge next to where the tank had been destroyed. The Tank Museum calls these artefacts 'holy relics of tank warfare'. |
 |
| The last surviving example of a Mark II tank, of which 50 were built in 1917-18. These unarmoured tanks were intended to be used only for training tank crews at Camp Bovington. After the Battle of the Somme in September 1916, the British Army ordered 1,000 tanks but did not have the crews to operate them, and it was Camp Bovington's role to train these crews. However, facing a shortage of tanks in April 1917, 26 Mark II tanks were deployed to France to participate in the Battle of Arras. Although they performed well, enemy artillery easily holed their unarmoured hulls. While all other Mark II tanks were eventually scrapped, this one had its guns removed and was converted into a supply tank to deliver fuel, oil, and ammunition to other tanks on the front lines. This Mark II is a 'Female' tank, denoted by the two machine guns mounted in sponsons on either side of the hull. Today, it is the world's oldest surviving tank to have seen battlefield service. |
 |
| The interior of the Mark II tank, showing part of the Daimler 6-cylinder, 105-horsepower engine. First World War tank crews faced a harrowing existence, working in unlit, hot, cramped, and noisy conditions and breathing in carbon monoxide fumes from the engine, which was located in the crew compartment. The Mark II tank was manufactured by William Foster & Company Ltd in Lincoln (Male variants) and Metropolitan Carriage Works of Birmingham (Female variants). It had a crew of eight, weighed 28 tonnes, and had a top speed of 6 km/h (3.7 mph). The Mark II featured 10mm (0.40 inches) of armour protection and was equipped with either two 6-pounder guns (Male variants) or four .303-inch Vickers machine guns (Female variants). |
 |
| A Renault FT-17 light tank, designed by French tank pioneer Jean-Baptiste Estienne and built by French automobile manufacturer Renault. Estienne envisaged overwhelming enemy forces using large numbers of these small, fast tanks, like a swarm of insects. The FT-17 was the first tank to carry its armament in a fully-rotating turret and has several other features that became hallmarks of tank design, including a driver position at the front and an engine and gearbox at the rear. Crewmen in the FT-17 enjoyed greater comfort than their British counterparts using the Mark II tank, as the FT-17's engine was in a separate compartment and the tank had a spring suspension system. Although thousands of FT-17s were ordered during the First World War, few were completed in time to see wartime service; however, many of the 3,950 FT-17s eventually built were exported to customers around the world. The FT-17 was in service until 1945, including by German forces for internal security operations in occupied France during the Second World War. The FT-17 had a crew of two, weighed seven tonnes, and was protected by 22mm (0.8 inches) of frontal armour. It had a distinctive curved rear-mounted skid to assist the short tank in crossing trenches. The FT-17's four-cylinder, 35-horsepower Renault engine drove it at a top speed of eight km/h (five mph) to a range of 60 kilometres (37 miles). The Male version of the FT-17 carried a Puteaux SA 1918 37mm gun, while the Female version carried an 8mm Hotchkiss machine gun. This FT-17 was a prototype built in 1917 and one of 150 unarmoured versions with Hotchkiss machine guns in cast steel turrets designed as training tanks. It was donated to the Imperial War Museum after the First World War, being subsequently transferred to the Tank Museum in 1965. |
 |
| A Medium Mark A tank, nicknamed the 'Whippet'. Designed to swiftly exploit gaps in the enemy lines made by the slow-moving heavy tanks and their supporting infantrymen, the Whippet was capable of a top speed of 12.9 km/h (8 mph), more than twice as fast as the heavy tanks of the time. Designed in 1917, the Whippet first entered service in March 1918. The Whippet had a crew of three, weighed 14 tonnes, and was protected by 12mm (0.5 inches) of frontal armour. Built by William Foster & Company Ltd of Lincoln, the same firm that built Little Willie and the Mark II tank, the Whippet had a separate engine, clutch, and gearbox for each of the left and right tracks, making it very difficult to drive. The Whippet had a short operational service life, being used only in 1918-19. This example, named Caesar II, went into battle on 29 August 1918 under the command of Lieutenant Cecil Sewell. Sewell spotted an overturned tank and jumped out of his vehicle to aid the crewmen trapped inside. Although he freed the crewmen, Sewell was shot and died almost immediately, being awarded the Victoria Cross for his bravery. |
 |
| A Crossley-Chevrolet armoured car. These simple, rugged, and cheap to manufacture armoured cars were designed to protect against small arms fire and were deployed by the British Army Tank Corps for security patrols on the North West Frontier of India, where raids and ambushes were frequent. In service in India for 20 years, the worn-out chassis of the Crossley armoured cars were mounted on the frames of Chevrolet trucks in 1938, with the now named Crossley-Chevrolet vehicles continuing to serve throughout the Second World War and up until 1947. The five-tonne Crossley-Chevrolet armoured car had a crew of four, was protected by 6mm (0.2 inches) of armour, and was armed with two .303-inch machine guns. Its six-cylinder, 78-horsepower engine gave the Crossley-Chevrolet armoured car a top speed of 64 km/h (40 mph). The distinctive dome-shaped turret provided protection against rifle bullets coming from all angles, an important feature in places like the Khyber Pass of Afghanistan, where the enemy could fire down onto the armoured cars from above. The small cupola atop the turret opened like a clam shell to allow the vehicle's commander to safely see the surrounding terrain. In the very hot operating conditions in North West India, the metal of the armoured cars could reach burning temperatures, so their interiors were covered with asbestos to protect the crewmen. To defend itself in riot situations, the exterior armour plating of the Crossley-Chevrolet could be electrified to shock anyone attempting to overturn the vehicle or climb on top. The Tank Museum's Crossley-Chevrolet armoured car, painted silver-grey to reflect the sun's heat, was presented to the museum by the Government of Pakistan in 1951. It is named 'Nowshera' after the Nowshera District in Pakistan's Khyber Pakhtunkhwa province. |
 |
| A photo of three Crossley armoured cars patrolling in front of the Red Fort in Delhi, India sometime in the 1920s. |
 |
| A Lanchester Mark II armoured car, designed by the Lanchester automobile company, a manufacturer of high end cars in the early 20th century. The Lanchester was one of the first armoured cars used by the British Army's cavalry units, entering service in 1928; however, the vehicle proved too large and expensive for conducting the stealthy reconnaissance patrols for which it had been designed and only 39 were built. Some remained in the UK for home defence duties, while others were deployed to Malaya where they took part in operations against the Japanese in the Second World War. In 1940, one Lanchester was converted into a comfortable and well-appointed wartime protected vehicle for carrying the Royal Family, the Prime Minister, and members of Cabinet. The Lanchester armoured car features a 6x4 drive train, with six wheels, four of which are powered; this arrangement was found to have superior off-road capability than an earlier four-wheeled version. The Lanchester was fitted with a number of 'luxuries', including wooden running boards (steps), lockers, luggage straps, tools, and bridging planks stowed under the running boards that could be used to cross ditches. Crewed by four men, the Lanchester weighed 6.65 tonnes, and was protected by 9mm (0.3 inches) of armour. Its six-cylinder, 88-horsepower engine gave a top speed of 72 km/h (45 mph). Armament consisted of one .50-inch machine gun and two .303-inch machine guns. The Tank Museum's Lanchester armoured car is the only surviving example of its kind. |
 |
| A Carden-Lloyd Mark VI carrier. Conceived by Major Giffard Le Quesne Martel of the Royal Engineers as a machine gun carrier for two-man infantry teams, Major Martel built the first prototype in his garage using spare parts. The concept was fleshed out by engineers John Carden and Vivian Lloyd and hundreds of these 'tankettes' were built by Vickers-Armstrongs after the firm of Carden and Lloyd merged with it in 1927. However, with the British Army's tradition-bound infantry regiments opposed to this cheap, innovative little vehicle, the Carden-Lloyd carriers in the British Army were transferred to the Royal Tank Corps, which used them for reconnaissance work. Powered by the same four-cylinder, 40-horsepower engine found in the Ford Model T automobile, the Carden-Lloyd carrier had a top speed of 40 km/h (25 mph) and weighed 1.5 tonnes. Protected by 9mm (0.3 inches) of armour, the carrier was armed with one .303-inch machine gun. The Carden-Lloyd carrier was built until 1941 and is considered the predecessor of the better known Universal Carrier of the Second World War. The Tank Museum's Carden-Lloyd carrier was built in 1928 for around £400 and served with several British Army regiments in the pre-war period before being relegated to a training vehicle at Camp Bovington. |
 |
| The Medium Tank Mark II, which was the mainstay of the Royal Tank Corps' main striking force during the interwar period. The Medium Mark II entered service in 1925 after the Mark I in 1923 and both tanks were almost twice as fast as First World War medium tanks, such as the Whippet. With a spring-mounted suspension system and rotating turret, the Mark II provided a more comfortable ride for its crew and could fire while moving. To start the tank's engine, a crewman had to wind a crank at the front of the vehicle. The Medium Mark II carried a crew of five, weighed 13.45 tonnes, and was protected by 12mm (0.47 inches) of frontal armour. Its Armstrong-Siddeley V8 90-horsepower engine gave the tank a top speed of 24 km/h (15 mph), and it was armed with a 3-pounder main gun in the hand-cranked rotating turret and three .303-inch machine guns. Although the Medium Mark II tank served until 1941, those based in Egypt upon the outbreak of the Second World War were deemed too slow to be effective; instead, they were buried up to their turrets in the desert and used as fixed defensive guns. The museum's Medium Tank Mark II is painted in the markings of the 5th Battalion of the Royal Tank Corps, the unit in which it served prior to the Second World War. By 1940, this tank had been relegated to a driver training vehicle at Camp Bovington. |
 |
| A view of the interwar armoured vehicles in the Tank Story gallery. |
 |
| A Vickers-Armstrongs Mark E tank, shown with ropes connected to its lifting points as if being prepared for loading onto a transport ship. Built by Vickers-Armstrongs of Newcastle and entering service in 1928, the Mark E tank was mechanically reliable, fast, and well-armoured. These characteristics made it an export success for the company, and the Mark E also influenced tank designs in the Soviet Union, Poland, and Italy. In the Soviet Union, a license-built version of the Mark E, known as the T-26, used the Mark E's hull paired with a Russian-designed turret. Nevertheless, the British Army initially rejected the Mark E as not meeting its requirements. The Mark E went on to become the world's second-most common tank by 1939 and served with the armies of a large number of countries, including Bolivia, the Republic of China, Finland, Greece, Poland, the Soviet Union, Thailand, and Turkey. The Mark E carried a crew of three, weighed 7.2 tonnes, and was protected by 13mm (0.5 inches) of frontal armour. It was armed with a 47mm main gun and one .303-inch machine gun. The Mark E's Armstrong-Siddeley four-cylinder, 45-horsepower engine gave the tank a top speed of 35 km/h (22 mph). The Tank Museum's Mark E was under construction at Vickers-Armstrongs as part of an export order for Thailand when war broke out in 1939 and was requisitioned by the British Army for use as a training tank. The camouflage pattern is a typical paint scheme applied by Vickers-Armstrongs when marketing the Mark E to foreign customers. |
 |
| A Panzerkampfwagen II, one of nearly 2,000 built. These simple, tough, and reliable tanks were used by the German army in every theatre of the Second World War until around 1943. The Panzer II's armament of a 20mm cannon and one 7.92mm machine gun meant that the vehicle was not designed to attack enemy tanks, though it was a useful light reconnaissance tank for gathering information on enemy forces and movements. The Panzer II carried a crew of three, weighed 9.5 tonnes, and had 35mm (1.3 inches) of frontal armour. Its six-cylinder, 130-horsepower petrol engine gave the Panzer II a top speed of 40 km/h (24 mph). The welded armour plates making up the Panzer II's hull made the tank stronger and avoided the threat of 'splash', the tiny splinters of hot metal that spatter the inside of a tank when a shell hits a weak point in the armour. The Panzer II's flat rear deck with engine vents provided a warm place for two crewmen to sleep while the third was on watch. The Tank Museum's Panzer II was built by Maschinenfabrik Augsburg-Nürnberg (MAN) and served with the 10th Panzer Division in North Africa, where it was captured in 1942. It now bears the camouflage scheme used on Panzer IIs for the invasion of France in 1940. |
 |
| A Light Tank Mark VIB, a thinly-armoured light tank used for reconnaissance duties. Its armament of one .50-inch machine gun and one .303-inch machine gun were suitable only for self defence. Facing the threat of war and a shortage of tanks, Britain selected the Light Tank Mark VIB as the first armoured vehicle for mass construction in the years preceding the outbreak of the Second World War. Introduced into service in 1936, the Light Tank Mark VIB was used extensively by British and Commonwealth forces in a number of theatres of the Second World War up to 1942, including against the Germans in France, against the Germans and Italians in North Africa, and against the Japanese in the Far East. The Light Tank Mark VIB had a crew of three, weighed 5.2 tonnes, and was protected by 14mm (0.5 inches) of frontal armour. Its Meadows six-cylinder, 88-horsepower petrol engine gave the tank a top speed of 56 km/h (35 mph). The Tank Museum's Light Tank Mark VIB likely never saw combat, instead being used as a training vehicle. Interestingly, although the tank's manufacturer's name plate was left in place on the side of the vehicle, the place of manufacture has been ground off to prevent the enemy from finding out the location of Britain's tank factories and bombing them. Note the smoke dischargers mounted on the turret; the Light Tank Mark VIB was one of the first tanks to be so equipped, and these dischargers would be used to launch smoke canisters to obscure the vehicle if it came under enemy fire, thus allowing the tank to escape unseen. |
 |
| A French Char B1 heavy tank, introduced in 1935. With its tracks running around the hull, the Char B1 more closely resembles the tanks of the First World War than those designed in the 1930s. While the Char B1 had a reputation as a fearsome armoured vehicle due to its imposing height, thick armour, and heavy armament, many were destroyed or captured by the Germans during their blitzkrieg invasion of France in 1940. The Char B1 had a number of faults, including a turret big enough only to accommodate the tank's commander, leaving him to communicate with his crew through shouts, nudges, or even kicks. Additionally, the tank's driver also had to aim and fire the hull-mounted 75mm gun, which required the entire tank to turn on its tracks to aim at an enemy. While also trying to read maps and issue orders to his crew, the commander was responsible for loading, aiming, and firing the turret-mounted 47mm secondary gun. The Char B1 had a crew of four, weighed 31 tonnes, and was protected by 60mm (2.3 inches) of frontal armour. Its Renault six-cylinder, 300-horsepower petrol engine gave the Char B1 a top speed of 27 km/h (17 mph). The Tank Museum's Char B1 was captured by the Germans in France in 1940 and used for internal security duties on the German-occupied island of Jersey in the Channel Islands between 1940 and 1945; it was shipped to Britain after the war. Many captured Char B1s were sent to a German-controlled workshop in Paris for modification, including the addition of radio aerials, lifting jacks, and concrete-filled welded armour on the top of the hull's front. |
 |
| Part of the exhibit addressing Germany's blitzkrieg invasion of Poland, France, and the Low Countries in 1939-40, with the Panzer II on the right. The brainchild of General der Panzertruppe Heinz Guderian as a result of his First World War experiences and his observations and thinking during the 1920s and 1930s, blitzkrieg brought together tanks, aircraft, artillery, and infantry in fast, concentrated combined arms operations designed to smash through the enemy front lines and sow confusion and disorder in the rear areas. |
 |
| Some of the early tanks with which Allied and German forces entered the war in 1939-40, including the German Panzer II (centre), the French Char B1 (left), and the British A13 Cruiser Mark III tank (right). |
 |
| A Liberty V12 petrol engine, originally developed by an American consortium for use as an aircraft engine. Prior to the outbreak of the Second World War, the British industrial firm headed by Lord Nuffield modified the Liberty engine for use in a range of cruiser tanks, including the A13 Cruiser Mark III on display here. William Morris, Lord Nuffield, was the owner of Morris Motors Group, the automotive company. In 1937, Nuffield established a division of his company (Morris Mechanisations Ltd) specifically to build tanks for the British Army. Working with the American tank designer JW Christie, Morris Mechanisations designed the A13 and Crusader cruiser tanks. |
 |
| The A13 Cruiser Mark III, designed and manufactured by Nuffield Mechanisation and Aero Ltd. It was the first tank to feature the Christie suspension system developed by American race car driver turned engineer JW Christie. The Christie suspension system involved the use of large wheels and powerful springs which gave a smoother ride and allowed the tank's gunner to fire while the vehicle was moving. With its Liberty V12 340-horsepower engine giving a top speed of 64 km/h (40 mph), the A13 was the fastest tank of 1940. Faster than the German panzers of the time, the A13 was designed to outmanoeuvre opponents on the battlefield rather than engage in head-on combat, and thus sacrificed thick armour protection in favour of speed. Nevertheless, despite its speed and good firepower, many British A13s were knocked out during the German invasion of France in May 1940. The A13 fared better in North African operations, where its speed allowed British armoured units to outflank Italian forces at Beda Fomm in Libya. The A13 had a crew of four, weighed 15 tonnes, and was protected by 30mm (0.5 inches) of frontal armour. It was armed with a 2-pounder (40mm) main gun and one .303-inch machine gun. The Tank Museum's A13 is depicted in the markings of a tank in the 10th Royal Hussars, 1st Armoured Division, which served in France in 1940; however, this particular vehicle was most likely used as a training tank during the war. |
 |
| The exhibit on the Second World War campaign in North Africa (June 1940 to May 1943), featuring the museum's iconic Tiger 131, a Panzer III, a Stuart tank, a Kettenkrad tracked motorcycle carrier, an 88mm PaK 43/41 anti-tank gun, and a Marmon-Herrington Mark IV armoured car. As noted by signage, the North African battles were ones of movement, where bare landscapes precluded the ability to hide and the vast distances and harsh desert conditions took a toll on men and machines. With no ability to hide behind fixed defences, there was room for commanders in North Africa to use initiative and tactics to advance and retreat as circumstances required, with the strength and security of supply lines often being the determining factor. |
 |
| The famous German Panzerkampfwagen VI, Sd Kfz 181, known as the Tiger I. This Tiger, hull number 131, is the best-known vehicle in the Tank Museum's collection and the only operational Tiger I tank in the world. Tiger 131 was built in January or February 1943 by Henschel in Kassel, Germany, with its turret being built by the Wegmann company. It was shipped to Tunisia in March/April 1943 and assigned as the commander's tank for No. 1 Company, No. 3 Platoon, 504th Heavy Tank Battalion. |
 |
| Tiger 131 took part in a German spoiling attack against British forces on the night of 20-21 April 1943 in order to disrupt Allied plans for a major offensive against Tunis. Tiger 131 was hit by shells fired by Churchill tanks of A Squadron, 4 Troop of the British 48th Royal Tank Regiment, with one shell hitting the Tiger's gun barrel and ricochetting downward into the turret ring. Two other British shells disabled the gun's elevation device and hit the loader's hatch, spraying shrapnel into the turret. With the gun unable to traverse or elevate, the driver and front gunner wounded, and the radio knocked out, Tiger 131 was effectively immobilised and its crew abandoned it on the battlefield. After having driven back the German attack, British forces captured the intact and driveable Tiger 131. Inspected by King George VI and Prime Minister Winston Churchill during a visit to Tunis in June 1943 after the defeat of Axis forces in North Africa, Tiger 131 was repaired with parts from other destroyed Tiger tanks. In October 1943, Tiger 131 was shipped to the UK for morale-boosting public displays and, later, for technical evaluation by the School of Tank Technology. On 25 September 1951, Tiger 131 was transferred to the Tank Museum, with a full restoration completed between 1990 and December 2003. With its original Maybach HL210 engine having been previously cross-sectioned for display, the HL230 engine from the museum's Tiger II tank was installed in Tiger 131 to make it driveable again. Additional work, including painting Tiger 131 in correct period colour scheme, was completed in 2012. |
 |
| Whereas the Tiger I was considered almost invincible by buoyed German troops, it caused panic amongst Allied tank crews when they first encountered the German behemoth in 1942-43: the Tiger's 102mm (4 inches) of frontal armour was impenetrable to Allied guns, while its 88mm gun could punch through 100mm of armour from 1,000 metres (3,280 feet) away. By fitting a snorkel and other waterproofing steps, the Tiger I could be driven underwater to cross rivers. Following its combat debut on the Eastern Front in Russia in September 1942, the Tiger I was deployed to Tunisia in 1943 and all of the major battlefronts in Europe until the end of the war in May 1945. Despite its psychological impact on Allied troops, the Tiger was not without some critical faults. It was underpowered, mechanically unreliable, and caught fire easily if hit; in fact, more Tigers Is were lost due to mechanical breakdowns than as a result of combat. Additionally, the width of the Tiger I posed complications for transporting the vehicle to the front, with its wide tracks having to be removed and replaced by narrower transport tracks in order to fit onto German railway flatbed carriages. The Tiger I had a crew of five, weighed 57 tonnes and, in addition to its 88mm main gun was equipped with two 7.92mm machine guns for self-defence. Its Maybach V12 650-horsepower petrol engine gave the Tiger I a top speed of 40 km/h (25 mph). |
 |
| A display of German tank crew uniform items and kit. The all-black uniform of the German tank crews created the impression of an elite force, as well as being practical from the standpoint of hiding dirt and grease. The tunics were tailor-made for each tank crewman, providing a better fit than uniforms issued from a central supply depot, and the buttons were hidden to avoid them snagging on equipment inside the tank. The rose-coloured piping on the uniform was the colour for the German army's armoured force. The 'Death's Head' collar patches were based on those previously used by the Imperial German Hussars; however, their similarity to the Schutzstaffel (SS) insignia meant that German tank crews were often mistaken as members of the SS. The display case also includes a flare pistol (bottom right) used to send messages when other forms of communication were unavailable; there were over 40 different types of signal cartridges and two types of grenades that could be fired from this flare pistol. On the left, under the tunic, is a Walther P38 pistol which was the standard issue pistol used by the German army during the Second World War. At the rear of the case is a Maschinengewehr-34, the standard infantry support machine gun used by the German army in the first half of the Second World War; it was also adapted to fit armoured vehicles. The Swastika flag hanging against the back of the display was adopted as the national flag of Nazi Germany in 1935; tank crews often tied Swastika flags across the fronts of their tanks to avoid being mistakenly attacked by German pilots hunting Allied tanks. |
 |
The Sd Kfz 2 Kettenkraftrad, a half-track motorcycle used by German forces on various battlefronts, including North Africa. Originally designed for use by paratroopers, the Kettenkraftrad was small and light enough to be carried in a transport aircraft. Unarmed and unarmoured, the Kettenkraftrad served as a tractor or communications vehicle, especially over terrain too rough to be navigated by wheeled vehicles. It is believed that the museum's Kettenkraftrad was captured by British forces in Tunisia at the same time as Tiger 131 in April 1943.
|
 |
| An Sd Kfz 141 Panzerkampfwagen III, a mainstay of the German armoured forces in North Africa. A simple and mechanically reliable tank, over 5,700 Panzer IIIs were built in a number of variants between 1937 and 1943 and served right until the end of the war in 1945. The Panzer III was also well suited to accommodate upgrades, with its armour tripling in thickness and its main gun increasing from 37mm to 50mm diameter over a five year period. The tank's escape hatches and large turret doors were especially valuable in providing ventilation in the hot desert conditions of the North African theatre. A radio antenna on the side of the tank could be raised using a lever inside the vehicle; the antenna was raised to send a message and lowered afterward to avoid being spotted. A rack on the rear of the Panzer III's hull was used to store water, clothing, and sleeping bags, while food (mostly canned and dried) was stored inside the tank. The Panzer III had a crew of five, weighed 22 tonnes, and its Maybach V12 300-horsepower petrol engine provided a top speed of 45 km/h (28 mph). The Tank Museum's Panzer III Ausf (model) L has 50mm (2 inches) of frontal armour protection and is armed with a 50mm main gun and two 7.92mm machine guns. It served with the 15th Panzer Division of General Erwin Rommel's Afrika Korps and was captured by British forces in August 1942. The Tank Museum has restored the vehicle to its original condition. |
 |
| Environmental conditions were extremely harsh in the North African desert, where temperatures could soar to over 60 degrees Celsius during the day, allowing soldiers to fry eggs on the metal of their vehicles. At night, tank crewmen sleeping outside their tanks shivered in sub-zero temperatures. Coupled with these extremes of temperature were sand storms that obscured the sun, torrential rainstorms, and sand flies which crawled into the soldiers' eyes, noses, and mouths. To keep the flies out of their mouths when eating, soldiers resorted to covering their faces with nets. Supplying the forces with adequate drinking water to cope with the desert heat was crucial, though this often had to be trucked over great distances from wells or supply dumps. When not engaged in operations, Allied and Axis tank crews broke up the boredom with meal times and reading and writing letters home. |
 |
| An American-designed and built M3A1 Stuart IV light tank. The M3 began development in 1933 with various prototype vehicles which, by 1940, had reached a mature design. Benefitting from the use of machine tools and mass production processes, the M3 proved to be a very reliable tank and was popular with British tank crews that operated it. The Stuart was the first American tank to be operated by Britain, being deployed to the North African theatre beginning in July 1941. While popular with its crews, the Stuart's drive shaft cover bisected the crew compartment, making it a challenge to traverse the turret and necessitating the installation of an internal turret basket so that the crew could traverse with the gun. Contact with German panzers in Libya demonstrated that the Stuart was no match and it was relegated to the reconnaissance role as M4 Sherman medium tanks began to arrive in larger numbers from 1942 onwards. Nevertheless, M3 Stuart tanks had a long postwar service life, with several countries continuing to use them into the 1980s. |
 |
| The M3A1 Stuart light tank had a crew of four, weighed 12.9 tonnes, and had a top speed of 57 km/h (36 mph). It was protected by 51mm (2 inches) of frontal armour and was armed with a 37mm M6 main gun and three .30-inch M1919 machine guns. This M3 Stuart, one of 13,859 built, is a hybrid, with an M3 hull and an M3A1 turret with the raised cupola removed. It is also one of 211 Stuarts to be fitted with a diesel engine rather than the standard petrol engine. It was donated to the Tank Museum by the Brazilian Army in 1990. |
 |
| A South African-built Marmon-Herrington Mark IV armoured car, which provided a better armoured and better armed reconnaissance capability in the North African theatre compared to previous armoured cars. Although built by Ford Motor Company of South Africa, most armoured cars built in South Africa were called Marmon-Herringtons after the Indianapolis-based company that supplied most of the automotive components for the vehicles. When a shortage of American-sourced parts occurred, automotive components were procured from Ford of Canada, with the armoured cars built from these parts being designated Mark IVF. Approximately 2,000 Marmon-Herrington Mark IVs were built before production ceased, with the vehicle being used by British forces between 1940 and 1944. Most of the vehicles were transferred to Greece and Jordan for frontier constabulary and internal security duties once they were no longer required for Allied military operations. The Marmon-Herrington Mark IV had a crew of three, weighed 6.4 tonnes, and had 12mm (0.47 inches) of armour protection. Its Ford V8 petrol engine generated 95 horsepower, driving the vehicle to a top speed of 80.5 km/h (50 mph). The Marmon-Herrington Mark IV was armed with one 2-pounder (40mm) gun adapted from the field artillery mounting rather than the 2-pounder tank gun, as well as one 0.30-inch machine gun. Although the Tank Museum's Marmon-Herrington was likely supplied to Camp Bovington as a sample vehicle, it has been painted in the markings of the Transjordan Frontier Force. It was restored to running order in 2007. |
 |
| A 380mm RW61 Sturmmörser mortar from a Sturmtiger assault gun. Originally developed as an anti-submarine weapon for the German Navy, the RW61 was fitted to converted Tiger I hulls to become a powerful self-propelled assault gun capable of firing a rocket-propelled mortar bomb to a range of 4,600 metres (15,092 feet). The mortar bombs were loaded into the weapon via a sliding breech and the blast of the rocket was deflected out of a series of tubes surrounding the muzzle. Eighteen Tiger I tanks returning from battle were converted into Sturmtigers through the replacement of their turrets with fixed armoured superstructures housing the mortars. This RW61 mortar tube is the only surviving piece of a Sturmtiger captured by British forces during the war and sent to the UK for testing and subsequent scrapping. |
 |
| The famous 88mm Panzer abwehr Kanone (PaK) 43/41 anti-tank gun. Based on Germany's 88mm anti-aircraft cannon, the gun was first used in an anti-tank role during the Spanish Civil War (1936-1939), proving to be a devastating tank killer. The 88mm gun formed the core of German General Erwin Rommel's anti-tank defences in the North African theatre, despite being cumbersome to operate and difficult to camouflage. In 1943, an improved version of the 88mm gun was developed with a two-piece barrel and the intent that tank and anti-tank versions of the gun could utilise the same ammunition. The PaK 43/41 anti-tank version was mounted on a four-wheel carriage while the KwK 43 tank gun was mounted in the Tiger II heavy tank and Jagdpanther tank destroyer. Due to delays in the production of the four-wheeled gun carriage, a simpler, two-wheel carriage using existing components was developed to meet the German Army's needs on the Russian front. While the gun was effective, it proved challenging for the crew to handle such a massive gun mounted on a two-wheel, split-trail carriage. |
 |
| The PaK 43/41 88mm anti-tank gun was manufactured by the German companies of Krupp and Rheinmetall between 1943 and 1945. It was crewed by three men and weighed three tonnes. It could fire shells to a maximum range of 17,500 metres (57,415 feet), with a muzzle velocity of 1,000 metres (3,281 feet) per second. When firing standard armour-piercing rounds, the gun could penetrate 159mm (6.25 inches) of armour from a distance of 2,000 metres (6,562 feet). Some reports even indicate that one PaK 43/41 knocked out six Soviet T-34 tanks at a range of 3,500 metres (11,483 feet). The Tank Museum's PaK 43/41 previously served as a gate guard at the School of Infantry in Warminster, Wiltshire, England. It was donated by the school to the Tank Museum in September 1996 and, when inspected, found to be extensively damaged by the elements after decades displayed outdoors. A full restoration was carried out between 2008 and 2012. |
 |
| An Sd Kfz 171 Panzerkampfwagen V 'Panther', the centrepiece of the exhibit on the July 1943 Battle of Kursk. The Panther's genesis was the shock experienced by German forces confronted by Soviet T-34 tanks during the invasion of Russia in June 1941. The T-34s were well-armoured, well-armed, and available in huge numbers and Hitler ordered that the T-34 be copied, with the resulting vehicle being the Panther. Whereas the T-34 was relatively simple in order to facilitate mass production, the Panther was of a much higher quality but also much more complex: the Panther's suspension system used torsion bars and 18 overlapping road wheels on each side to distribute the weight of the tank's wide tracks on soft ground. The Panther first saw combat action in Operation Citadel, the brutal eight-day Battle of Kursk, the largest armoured battle of the Second World War, in which 900,000 German soldiers and 2,700 German armoured vehicles faced 1.3 million Soviets and 3,306 Soviet armoured vehicles; the Soviets won a decisive victory despite suffering staggering losses. Ultimately, despite its superior quality construction and battlefield performance, the slow production of Panthers meant that they were never available in sufficient numbers to have strategic effect in the Russian, Italian, or North West European theatres. |
 |
| The Panther had a crew of five and weighed 44 tonnes. Its Maybach V12, 700-horsepower petrol engine provided a top speed of 45.8 km/h (28.5 mph). Protected by 80mm (3.1 inches) of frontal armour, the Panther was armed with a 75mm main gun and two 7.92mm machine guns. This particular Panther was one of several captured under construction when British forces overran the Maschinenfabrik Niedersachsen factory in Hannover, Germany in 1945. It was completed by the factory's workforce under the supervision of personnel from 823 Armoured Workshop of the British Army of the Rhine's Royal Electrical and Mechanical Engineers (REME). |
 |
| A T-34/76 tank, the most common Soviet tank of the Second World War. Its sloped armour provided enhanced protection against enemy fire, its proven Christie suspension system improved mobility, and its wide tracks more effectively distributed the tank's weight when driving over soft ground. An effective 76.2mm gun rounded out a tank that shocked German forces when they encountered the T-34 for the first time in June 1941. As the Soviets anticipated that tanks would be frequently lost in combat, the T-34 was crudely-built compared to the precision engineering employed by the Germans. Whereas British tanks had padding on the inside of the fighting compartment to prevent injury to the crew, Soviet tank crews were issued with padded helmets. Despite its rough design, the T-34's simplicity, ease of maintenance, and mechanical reliability were the keys to its success. As the war progressed, the only upgrades or alterations that were permitted to the T-34 design were those that would reduce construction costs or speed up the rate of production. Only in late 1943 was the T-34/85 upgrade allowed in recognition of the fact that the T-34/76 design was being outclassed by newer German tanks like the Tiger and Panther. The T-34/76 had a crew of four and weighed 28.5 tonnes. Its V12, 500-horsepower diesel engine gave the T-34 a top speed of 47 km/h (34 mph). It was protected by 65mm (2.5 inches) of frontal armour and was armed with a 76.2mm F34 main gun and two 7.62mm machine guns. This T-34/76, an early production model built by Factory Number 183 in Kharkov, Ukraine, was captured by Finnish forces on 2 October 1941 and pressed into Finnish service. Post-war, it was used as a training vehicle until 1955 and then transferred to the Finnish Military Museum in 1980; it is currently on loan to the Tank Museum. |
 |
| A display on Field Marshal Bernard Montgomery, including his famous black beret; a watercolour painting, entitled 'Field Marshal Montgomery, 1945'; Monty's pension book; a humorous Christmas card signed by Montgomery with a photo of him stepping out of a car and captioned 'The arrival of the Messiah!'; a plaque made by a tank sergeant serving in Monty's Eighth Army in the North African desert; a hunting horn presented to the Eighth Army's 40th Royal Tank Regiment and nicknamed 'Monty's Foxhounds'; and one of Montgomery's pullovers, which he often wore instead of a battledress jacket in the summer of 1944 during operations in North West Europe. |
 |
| Monty's famous black, two-badged beret, adorned with his general officer's badge and the badge of the Royal Tank Regiment. It was given to Montgomery by Sgt Jim Fraser, the NCO in charge of Monty's command tank in North Africa. Fraser had noticed that the wind often blew off Montgomery's Australian bush hat when the general emerged from his tank to talk to troops, so Fraser gave his own beret to Montgomery before the October 1942 Battle of El Alamein. Montgomery wore the beret from El Alamein to the final victory over Axis forces in Tunisia in 1943, by which time it was so dirty it needed to be replaced. The two-badged beret was Montgomery's iconic look and he thereafter always wore two badges on his beret. Montgomery personally gifted his beret to the Tank Museum on 29 September 1945. |
 |
| A Churchill Mark VII Crocodile flame-thrower tank. The Churchill tank's debut in 1941 was plagued by mechanical defects; however, by the time the Churchill Mark VII was introduced in 1943, the design flaws had been rectified. Although a slow tank, the Churchill proved adept at climbing hilly terrain In Tunisia and Italy that was impassable for other tanks, and its thick frontal armour (thicker than that of the German Tiger I) was valued by its crewmen. Some Churchills were adapted as flame-thrower tanks (designated 'Crocodile') and were deployed by Allied forces from the June 1944 D-Day landings onward. The flame-thrower, mounted in the centre of the hull between the tracks, had to be used within 30 minutes of the gas pressure being raised or else it would leak away and the flame-thrower would fail. The brass plaque on the front of the turret states that this was the last Churchill tank ever built, being transferred to the Tank Museum directly from the Vauxhall Motors factory in 1949. |
 |
| The Churchill Crocodile had a crew of five, weighed 40 tonnes, and had a top speed of 24 km/h (15 mph) courtesy of its Bedford 12-cylinder, 350-horsepower petrol engine. The tank was protected by 152mm (5.9 inches) of frontal armour and armed with a 75mm main gun and two 7.92mm machine guns. |
 |
| The trailer containing the flame fuel and propellant that was towed behind the Churchill Crocodile. A hose connecting the trailer to the tank was used to draw the pressurised liquid fuel to the flame-thrower gun mounted at the front of the tank. Although the Churchill Crocodile's flame-thrower struck terror into enemy troops faced with the prospect of being burned alive by a jet of flaming fuel, service in Crocodiles was also dangerous due to the fact that a direct hit from an enemy shell would cause the flame-thrower fuel being pumped inside the tank to explode in a massive fireball. Additionally, the fuel trailer made it very difficult for the Churchill Crocodile to reverse quickly in an emergency. Of note, Churchill Crocodiles of the 7th Royal Tank Regiment were used to burn down buildings and sterilise the ground at the typhus-plagued concentration camp at Belsen in northern Germany at the end of the Second World War. |
 |
| A Mark II Daimler armoured car, used for scouting ahead of tank forces to locate the enemy and report his movements, as well as identify approach routes for friendly forces. The Daimler's flexible suspension system gave it excellent cross-country performance and its 2-pounder (40mm) gun was the same as that mounted on early cruiser tanks. Designed in 1939 and built by the Daimler Company in Coventry, this armoured car was used by many British Army cavalry regiments during the Second World War. Its success on the battlefield was due to it having been designed from the ground up as an armoured car, contrary to the previous practice of mounting an armoured body and turret upon the chassis of a regular automobile or truck. As with many armoured car designs, the Daimler had a secondary, rearward-facing driver position and viewing slot so that the car could be reversed quickly out of danger without needing to first turn around. The Daimler armoured car had a crew of three and weighed 7.5 tonnes, with its six-cylinder, 95-horsepower petrol engine giving it a top speed of 80 km/h (50 mph). It was protected by 16mm (0.6 inches) of armour and, in addition to its 2-pounder gun, mounted one 7.92mm machine gun. The Mark II Daimler armoured car, an improved version of the original design, served in the British Army between 1941 and 1962 before being replaced by the heavier, six-wheeled Saladin armoured car. The Tank Museum's Mark II Daimler served beyond 1948 before being donated to the museum. |
 |
| The North West Europe Campaign section of The Tank Story gallery, with the Daimler armoured car in the foreground and the Sherman Firefly and Churchill Crocodile tanks in the distance. |
 |
| A Sherman Firefly, the first Allied tank capable of knocking out the German Panther and Tiger tanks. Sporting the long-barrelled 17-pounder (76.2mm) gun, the Firefly relied on its firepower and accuracy to take out enemy tanks before they could respond, since the Firefly's armour was much thinner than that of its German opponents. The success of the Sherman Firefly against the German heavy tanks made it a priority target and Firefly crews often took steps to camouflage the distinctive long barrel by painting the end a different colour to make it appear shorter. During one engagement in Normandy on 8 August 1944, a single Sherman Firefly of the 1st Northamptonshire Yeomanry knocked out three Tigers, including one commanded by Waffen-SS tank ace Michael Wittmann, who was killed when the ammunition aboard his Tiger exploded, blowing the turret off. Trials to install the longer 76.2mm gun in the Sherman were carried out successfully at the Lulworth Gunnery School near Bovington and the Firefly entered operational service shortly before the 6 June 1944 D-Day landings. The size of the gun and its consequently larger ammunition forced the crew complement to be reduced from five to four, and the radio had to be installed in an armoured box at the back of the turret as there was now insufficient room in the standard Sherman turret. The Sherman Firefly weighed 34.2 tonnes and was protected by 75mm (3 inches) of frontal armour, while its 30-cylinder, 370-horsepower Chrysler Multibank petrol engine gave it a top speed of 35 km/h (22 mph). In addition to its 17-pounder gun, the Firefly sported one .30-inch machine gun for self-defence. The Tank Museum's Firefly is an early model which likely served as a training vehicle and has been painted in the markings of the first British tank (from the 2nd Armoured Battalion, Grenadier Guards) to cross the Rhine River at Nijmegen during Operation Market Garden in September 1944. |
 |
| The Sherman Firefly (right) and a Cromwell Mark IV (left) in the Liberating Europe exhibit within The Tank Story gallery. |
 |
| A Cromwell Mark IV, the most common version of the Cromwell cruiser tank, with more than 1,900 built. Although designed in 1942, it was not until June 1944 that the Cromwell's early mechanical problems had been corrected and the vehicle was ready for operational service. With its armour protection and firepower already outclassed upon its entry into service, and with most British armoured regiments fielding the more effective Sherman tank by 1944, the Cromwell was used for reconnaissance duties rather than as a frontline gun tank. The Cromwell's powerful Rolls-Royce Meteor engine (derived from the Merlin aero engine fitted to the Spitfire, Hurricane, Mosquito, and Lancaster) and an effective Christie suspension system gave the tank good speed and cross-country performance. Two mushroom-shaped extractor fans on the Cromwell's hull and turret roof sucked noxious fumes out of the turret after the gun was fired. Built by Leyland Motors, the Cromwell Mark IV had a crew of five and weighed 27.5 tonnes, with its 600-horsepower Meteor petrol engine giving a top speed of 56 km/h (35 mph). Protected by 76mm (3 inches) of frontal armour, the Cromwell was armed with a 75mm main gun and two 7.92mm machine guns for self-defence. The Cromwell continued in service after the war, being finally retired by the British Army in 1952 and also serving in the armies of Greece, Israel, Czechoslovakia, Poland, and Portugal. The Tank Museum's Cromwell was a training tank at Camp Bovington during the war, but has been painted in the markings of the 1st Polish Armoured Division's 10th Mounted Rifles, the division's reconnaissance regiment. |
 |
| A Sherman Duplex Drive (DD) tank, concealed behind its collapsible watertight screen. Inspired by an idea from Hungarian engineer Nicholas Straussler, the British adapted the American-designed Sherman tank to support infantry on amphibious operations, adding the canvas screen to keep the tank afloat during landing operations and two propellers at the rear to drive the tank forward in the water. The screen was raised by inflating thick black rubber tubes on the inside. After successfully landing on a beach, the Sherman DD's crew would collapse the screen to allow the gun to be brought into action. Once time permitted, the screen would be cut away entirely and discarded. During the 6 June 1944 D-Day landings, British, Canadian, and US Sherman DD tanks were launched from landing craft, some positioned over two miles off the Normandy beaches, and swam ashore to provide crucial fire support to the infantry landing forces. Not all of the Sherman DDs were successful, however, with 27 of 29 DDs of the 741st US Tank Battalion being swamped by waves and sinking before they could get onto Omaha Beach. The Sherman DD tanks and other special purpose vehicles used by British forces during the Normandy landings were part of the British Army's 79th Armoured Division established in the summer of 1942 and commanded by the eccentric but brilliant Major General Sir Percy Hobart. These vehicles came to be called 'Hobart's Funnies' and, in addition to the Sherman DDs, included mine flail tanks, Royal Engineer assault vehicles, bridge-layers, flame-thrower tanks, and armoured bulldozers. The Sherman DD tank had a crew of five, weighed 34.5 tonnes, had 75mm (3 inches) of armour protection, and was armed with a 75mm main gun and two .30-inch machine guns. The Tank Museum's Sherman DD is the world's most complete surviving example of its kind and is based on a Sherman III tank. |
 |
| A closer view of the twin pivoting propellers at the rear of the Sherman DD. The tank's two GMC six-cylinder, 410-horsepower diesel engines provided a top speed of 40 km/h (25 mph) on land and eight km/h (4.9 mph) in the water. The Sherman DD was navigated in the water by a crewman standing on a platform from which he could see out over the top of the screen. When swimming, all of the tank's crew except for the driver stood on the outside of the tank's hull to enable a quick escape if the tank began to sink; nevertheless, all Sherman DD tank crews were trained in submarine escape techniques if they could not extricate themselves in time. |
 |
A look at the Cold War exhibit in The Tank Story gallery, including the M48 Patton (left), Ferret scout car (centre) and Saladin armoured car (right).
|
 |
| A Centurion, the product of all of the lessons learned by the British Army's armoured forces during the Second World War. The Centurion's adaptability to being upgraded with heavier armour and bigger guns without changes to its basic structure has given it a reputation as perhaps the finest tank of its era. Over a 20-year production run, the Centurion evolved from Mark 1 to Mark 13. The Centurion was one of the first tanks to be equipped with an automatic gun stabiliser which ensured the gun remained locked on its target even while the tank was moving over rough terrain; this made firing on the move much easier and more accurate, and also reduced risk to the Centurion by avoiding it becoming a sitting target. Although the Second World War in Europe ended just before the Centurion was ready for service, the design was a major export success for British tank manufacturers Royal Ordnance, Vickers, and Leyland Motors. Most Commonwealth countries purchased the Centurion, as did many nations in Europe and the Middle East, and the tank has seen action in conflicts around the world, including in Vietnam, India, South Africa, and the Middle East. Upgraded Centurions or support vehicles derived from them remain in service with the armies of Israel, Jordan, and South Africa. |
 |
The Tank Museum's Centurion Mark 3 was used to develop a prototype Centurion Crocodile flame-thrower tank; however, it never went into service. It is painted in the markings of a tank in 3 Troop, C Squadron, 1st Royal Tank Regiment, part of the Commonwealth Division in the Korean War. That tank was used to defend a geographic feature named 'The Hook' against Chinese forces in Korea in May 1953. The Centurion Mark 3 had a crew of four, weighed 50 tonnes, and had a top speed of 35 km/h (22 mph) courtesy of its 600-horsepower Rolls-Royce V12 petrol engine. It was protected by 101mm (3.9 inches) of frontal armour and was armed with a 20-pounder (83.8mm) main gun and a 7.92mm machine gun.
|
 |
Named after US Army General George S. Patton, the American M48 Patton tank entered service in 1952 around the same time as the British Centurion and Soviet T-55 tanks. Nearly 12,000 M48s were built, with large numbers being exported to allied armies as well as serving in the US Army and US Marine Corps. The M48 featured an automatic gearbox and power-assisted steering, making it much easier to drive than other tanks of the era. Its hull and turret were made of single steel castings rather than welded steel plates, which gave the M48 immense strength but also a rougher texture. The curvature of the lower hull helped to deflect blast from mines, leading to higher survival rates for M48 crews. The M48 saw prominent service in the Vietnam War, despite there being little tank-on-tank action, and was a powerful psychological deterrent to North Vietnamese and Vietcong forces. It was also often used in a static artillery role in Vietnam, in support of American and South Vietnamese infantry. The M48 and/or derivative vehicles remain in service in a number of countries, including Germany, Greece, Iran, Lebanon, Morocco, Poland, South Korea, Taiwan, Thailand, and Turkey. The M48 had a crew of four, weighed 45 tonnes, and had a top speed of 42 km/h (26 mph) courtesy of its 810-horsepower Continental V12 petrol engine. It was protected by 110mm (4.2 inches) of frontal armour and armed with a 90mm main gun, one .50-inch machine gun, and one .30-inch machine gun. The Tank Museum's M48 is an early model, called a T48, which was sent to the UK for testing and evaluation.
|
 |
| The Saladin armoured car replaced the Daimler as the primary armoured car of the British Army in the post-war period, serving between 1959 and 1975. Wartime experience had demonstrated the utility of reconnaissance vehicles having a powerful gun for self-defence, and the Saladin was equipped with a 76mm main gun and one 7.62mm Browning machine gun which traversed and elevated together in a co-axial mounting. Given the threat of landmines to reconnaissance vehicles, the Saladin and the other six-wheeled military vehicles in the Alvis product line were designed to be able to drive on four wheels if two were blown off by mine blast; it did not matter which two wheels were destroyed. Wheeled armoured vehicles provided a more comfortable ride for their crews, and were also more stealthy because they did not use clattering metal tracks; however, the Scorpion (the Saladin's replacement beginning in 1972) was tracked. The Saladin had a crew of three, weighed 11.5 tonnes, was protected by 16mm (0.6 inches) of armour, and had a top speed of 72 km/h (45 mph) courtesy of its six-cylinder, 160-horsepower Rolls-Royce petrol engine. The Tank Museum's Saladin is one of six prototypes built by Manchester's Crossley Motors before production of the Saladin was moved to Coventry-based Alvis Ltd. It is painted in the markings of the British Army's Queen's Own Hussars cavalry regiment, which was based in Hong Kong in 1969. |
 |
| A Ferret scout car, built by Daimler and designed to replace its successful but smaller wartime Dingo scout car. Like the Dingo, the Ferret could be driven backwards at high speed to escape from dangerous situations, as its primary mission was to gather intelligence and make a quick escape rather than engage the enemy. Interestingly, the Ferret's original name was to have been Field Mouse until it was decided that such a name sounded too timid. Over its British Army service life between 1952 and 1991, the Ferret was given numerous design upgrades. Some models of Ferret received armament upgrades, such as the installation of Vigilant and, later, Swingfire anti-tank missile launchers. The Ferret had a crew of two, weighed 4.4 tonnes, and was protected by 16mm (0.6 inches) of armour. Its six-cylinder, 129-horsepower Rolls-Royce petrol engine gave it a top speed of 93 km/h (58 mph). |
 |
| The Ferret scout car was an ideal vehicle for United Nations peacekeeping operations as its small size was less threatening than large tanks. When engaged in normal army reconnaissance duties, however, the Ferret was painted in camouflage. When deployed in the field on reconnaissance missions, the Ferret had to be self-sufficient, thus the outside of the vehicle had mountings for a variety of equipment, including a cooker, a spade, a pickaxe, a first aid kit, and the crewmen's helmets. The interior of the Ferret was very cramped, especially when the driver's hatch and the turret flaps were closed up in action. The Tank Museum's Ferret is a Mark II, fitted with a turret housing a 7.62mm Browning light machine gun. It was used in peacekeeping operations on Cyprus and served in various British Army armoured regiments. Despite being retired from service in the UK, major Commonwealth countries, France, and other nations, a large number of Ferrets remain in service in the armed forces of many African and Middle Eastern states. |
 | Mementos donated to the Tank Museum by Lieutenant Colonel Stephen Harrison, MBE, a member of the British Commanders-in-Chief Liaison Mission to Soviet Forces in Germany (BRIXMIS) between 1986 and 1988. BRIXMIS and its equivalent Soviet, French, and American organisations were established after the Second World War to collect intelligence in Allied-occupied Germany. Included in their general collection remit, BRIXMIS personnel were specifically tasked to gather information on the new Soviet T-80 tank and reactive armour. Fluent in Russian and German, Lt Col Harrison was able to mingle with Warsaw Pact military personnel and gather valuable intelligence, despite being arrested 11 times and surviving two shooting incidents. Items displayed include signs prohibiting foreign mission personnel from entering sensitive areas (which were routinely ignored by Lt Col Harrison and his colleagues); a component from a Soviet MiG 23 fighter aircraft recovered by Harrison from a Russian garbage dump; a collection of Soviet military watches collected during social interactions with Soviet officers; a diamond-tipped scraper disguised as a pen and used in conjunction with black graphite grease to collect samples of Soviet armour for analysis and assessment of its performance; a cigarette case with the emblem of the Soviet Guards Army, a gift from a Soviet tank officer; a blue East German petrol-fuelled cooker used by BRIXMIS officers when in the field to avoid being identified as as foreign officers if they had to hurriedly abandon a camp site; a Soviet Army wedge cap gifted to Harrison by a Soviet officer; a diamond-shaped tactical route sign noting the direction Soviet armoured vehicles should take on East German roads; and maps used by BRIXMIS officers to get close to target areas, such as firing ranges, to gather intelligence. BRIXMIS and its Soviet, French, and American counterparts were deactivated on 2 October 1990, on the eve of German reunification.
 | | A prototype of the German Leopard I tank, built in 1963. In the post-war period, German tank designers moved away from the increasingly heavy armour and firepower of the wartime tanks (e.g. Panther, Tiger, and King Tiger) and opted for smaller designs that emphasised mobility. Indeed, mobility was seen as offering a degree of protection itself, as the Leopard's crew could rely on their vehicle's speed and stealth to avoid much enemy fire. The Leopard I proved an engineering success and was exported to a large number of countries, with many still in service after upgrades over the decades. Nearly every country that operated British-made Centurion tanks, such as Australia and Canada, opted for the Leopard when it came time to purchase new tanks. To cross rivers, the Leopard I could be made amphibious through the installation of a snorkel device. Built by Krauss-Maffei, the Leopard I had a crew of four, weighed 40 tonnes, and its MTU 10-cylinder, 830-horsepower engine gave a top speed of 64 km/h (40 mph). It was protected by 70mm (2.7 inches) of armour and armed with a 90mm main gun and a 7.62mm machine gun for self-defence. The Tank Museum's Leopard I was used in trials to test its performance against that of the British Chieftain tank, with the Leopard found to be much easier to maintain and far more mechanically reliable than the labour-intensive Chieftain. Its original 90mm gun was upgraded to a 105mm gun by the Royal Ordnance Factory while at the Tank Museum. |
 | The British-designed Chieftain tank, which debuted in 1966 and enjoyed a service life of 30 years before being retired by the British Army in 1996. The Chieftain was the world's first Main Battle Tank, being designed both to destroy enemy tanks and offer direct support to infantry forces on the battlefield. It was a very advanced design for its time, featuring a powerful 120mm main gun firing High Explosive Squash Head (HESH) rounds; these HESH rounds pancaked upon impacting an enemy vehicle's side, sending a shockwave through the armour and causing a 'scab' of metal to break off and ricochet around inside, killing or injuring the crew. The Chieftain also enjoyed a high degree of protection courtesy of its novel, sloped frontal armour. To reduce its height for the purposes of easier concealment, the Chieftain's designers placed the driver in a lying position, with gears shifted via a foot pedal and a periscope used to see out the front. A telephone mounted in a box on the back of the Chieftain allowed infantrymen to communicate with the tank crew when the vehicle's hatches were closed up; a long phone cord allowed the caller to stand at the side of the tank rather than behind it, where there was a much greater threat if the tank had to suddenly reverse. In light of the growing threat of nuclear, biological, and chemical (NBC) warfare during the Cold War, the Chieftain was the first British tank outfitted with NBC protection equipment, including an air filtration system mounted in a large box on the back of the turret. The Chieftain's boat-shaped hull bottom and side-mounted suspension gave it a greater degree of survivability from mine blasts than the German Leopard I. Over its service life, the Chieftain evolved through 13 versions, with upgrades including the computerisation of its gun control equipment and the addition of 'Stillbrew' armour to the front of the turret; however, the Chieftain's poor engine reliability meant that it was never an export success like its predecessor, the Centurion. Built by Royal Ordnance and the Vickers company, the Chieftain had a crew of four, weighed 55 tonnes, and had a top speed of 48 km/h (30 mph) provided by its Leyland L60 12-cylinder, 750-horsepower engine. It featured 120mm (4.7 inches) of armour protection and, in addition to its 120mm main gun, had a 7.62mm machine gun for self-defence. The Tank Museum's Chieftain was originally built as a Mark 5 and entered service in 1972. Over the years it was upgraded to Mark 12 standard and saw service with British forces based in Germany, including the 4th Royal Tank Regiment, the 4th/7th Dragoon Guards, and the Royal Hussars.
|
 | | A display of various tank gun barrels and the ammunition fired from them. From left to right: a 76mm gun barrel from a Saladin armoured car with a low-velocity High Explosive Squash Head (HESH) round; a 105mm barrel with a HESH round; a 105mm barrel from later marks of the Centurion and early model Leopard tanks with a Spinning Tubular Projectile training round; a 20-pounder barrel from a Centurion Mark 3 with a high-velocity Armour Piercing Discarding Sabot (APDS) training round; an experimental 120mm barrel with an experimental 120mm High Explosive Anti-Tank (HEAT) round; an American-designed 120mm barrel with an APDS round originally fitted to the British Conqueror tank; a 120mm barrel from a British Chieftain tank with a 120mm smoke round; an experimental 120mm barrel developed for the cancelled MBT 80 tank with a Fin Stabilised Armour Piercing Discarding Sabot (FSAPDS) round; a 20-pounder barrel with a canister round loaded with 580 bullet-sized metal pellets for use against personnel; and a 76mm barrel with a High Explosive (HE) round. Some of the barrels are equipped with muzzle brakes which capture some of the gasses resulting from firing and redirect them outwards to reduce the gun's recoil by up to 50 percent; muzzle brakes can also help to balance the gun in the turret. |
 | The Alvis Scorpion reconnaissance tank, introduced into service in 1973. Its six-cylinder, 195-horsepower Jaguar car engine, coupled with a lightweight welded aluminium hull, gave the eight-tonne Scorpion a top speed of 72 km/h (45 mph) and allowed it to operate on terrain too soft for heavier armoured vehicles. Indeed, the Scorpion's wide tracks distributed the vehicle's weight so effectively that its ground pressure was no more than that of a human foot. The flat metal plate around the edge of the Scorpion concealed a folding screen which, when erected, gave the Scorpion an amphibious capability. The lightweight Scorpion was air transportable, able to be lifted by a Chinook helicopter or inside a military transport aircraft. Unlike other British tanks, where the engine was rear-mounted, the Scorpion's engine is located at the front of the vehicle, with the driver sitting alongside it. Although the Scorpion's responsive brakes could stop it very quickly, if the driver applied too much brake while at speed, the vehicle was prone to pitching up almost onto its nose. Between 1973 and its retirement in 1994, the Scorpion saw service in the 1982 Falklands War and the 1991 Gulf War, and was also deployed on peacekeeping operations in Cyprus. The Scorpion had a crew of three and was armed with a 76mm main gun and a 7.62mm machine gun for self-defence. The decision to retire the Scorpion from service was due to the engine fumes that accumulated in the turret, endangering the crew. The Tank Museum's Scorpion was a prototype vehicle, used for testing. |
|
 | A Soviet T-62 tank, first seen in public during a military parade in Moscow in May 1965. Longer and wider than previous Soviet tanks, it was the first tank to sport a smooth bore (rather than rifled) main gun. The large turret ring of the T-62 allowed it to accommodate the sizeable 115mm gun, though the turret remained cramped for the three men (commander, gunner, and loader) who were positioned in it. Infra-red sights at the front of the T-62 allowed the crew to fight at night, though unlike modern-day thermal imaging sights, infra-red sights emitted light that could be detected by enemy forces. A hatch at the rear of the turret could be opened to discard spent shell casings from the main gun after firing via an automated ejection system; however, if the system became misaligned, the gun could eject the shell casings at high speed into the rear of the turret, causing fatalities to the crew. As Soviet Cold War armoured doctrine emphasised quantity over quality to win battles, over 20,000 T-62s would be built, outnumbering NATO tank forces by a margin of ten to one. Interestingly, Soviet Army policy was to employ tank crews made up of strangers so that KGB spies could be infiltrated and report on any disloyal comments made by crewmen. The T-62 proved to be an export success for the Soviet Union, being sold to 23 countries. It was used by Iraqi forces in the 1991 and 2003 Gulf Wars and by the Soviet Army in the 1968 invasion of Czechoslovakia and the 1979-1988 war in Afghanistan. The T-62 had a crew of four, weighed 40 tonnes, and had a top speed of 75 km/h (47 mph) provided by its V12 700-horsepower diesel engine. It was protected by 102mm (4 inches) of frontal armour and, in addition to its 115mm main gun, was equipped with a 7.62mm machine gun for self-defence. The Tank Museum's T-62 was captured from Iraqi forces in 1991 and shipped to the UK for evaluation, being donated to the museum thereafter; apart from a new coat of paint, it remains in the same condition as when captured.
|
 | A display of modern-day British tank crew uniforms, medals, and equipment, as well as notable mementos. On the left is a set of non-fire resistant tank crew overalls used only for training; because the fire retardant combat version of the overalls loses its effectiveness with each washing, British tank crews are only issued with the fire retardant version before being deployed on combat operations. To the right is a modern British Army tank crewman's Kevlar helmet, with the iconic blue United Nations beret displayed further right. On the right side of the display is the uniform worn by Brigadier Patrick Cordingley during his time as commander of the UK's Seventh Armoured Brigade during the first Gulf War. Cordingley commanded the British and US attack which punched through Iraqi defences in February 1991. The uniform consists of a beret, desert boots, standard issue British Army desert camouflage trousers and shirt, and an American night camouflage desert parka, which was especially useful during cold desert nights. In the centre of the display is a gold-plated model of the Challenger 1 tank, commissioned by Vickers and originally intended as a gift for the Shah of Iran in gratitude for the country's agreement to purchase the Challenger (originally developed for Iran as the Shir 2); when the Shah was overthrown in the 1979 Islamic Revolution, the Shir 2 was renamed Challenger and adopted by the UK Army, with the gold model being donated to the Tank Museum. The deck of 'personality identification cards' to the left of the gold tank model was created by the US government following the 2003 US-led invasion of Iraq and issued to US and allied troops to assist them in recognising the most wanted members of Saddam Hussein's government. At the bottom of the display is a Soviet RPG-7 rocket launcher, first introduced into service in 1961 and capable of penetrating 320mm (12.6 inches) of armour.
|
 |
| This virtual tour of the Tank Museum ends with a look down the barrel of the museum's iconic and menacing Tiger 131. |


.jpg)
.jpg)


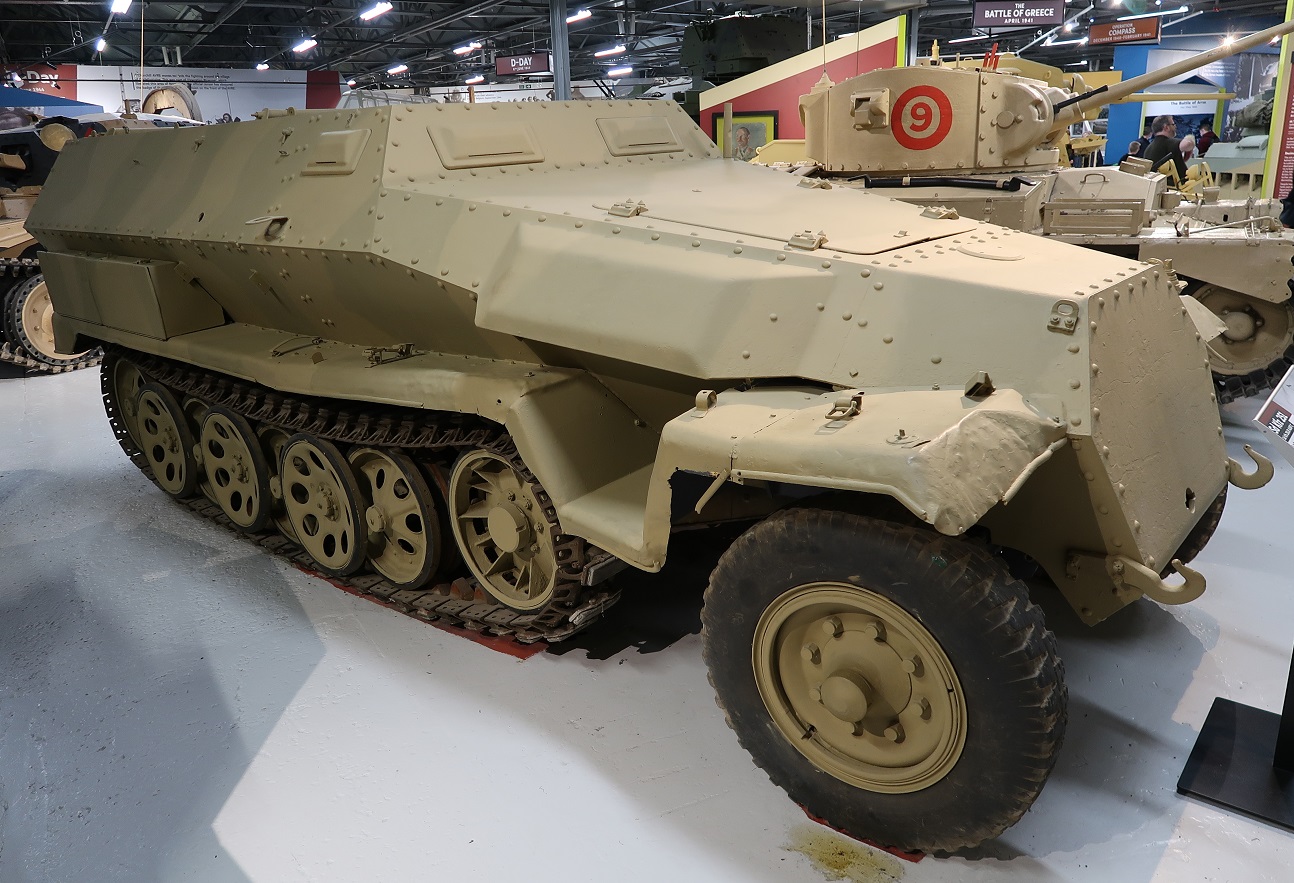


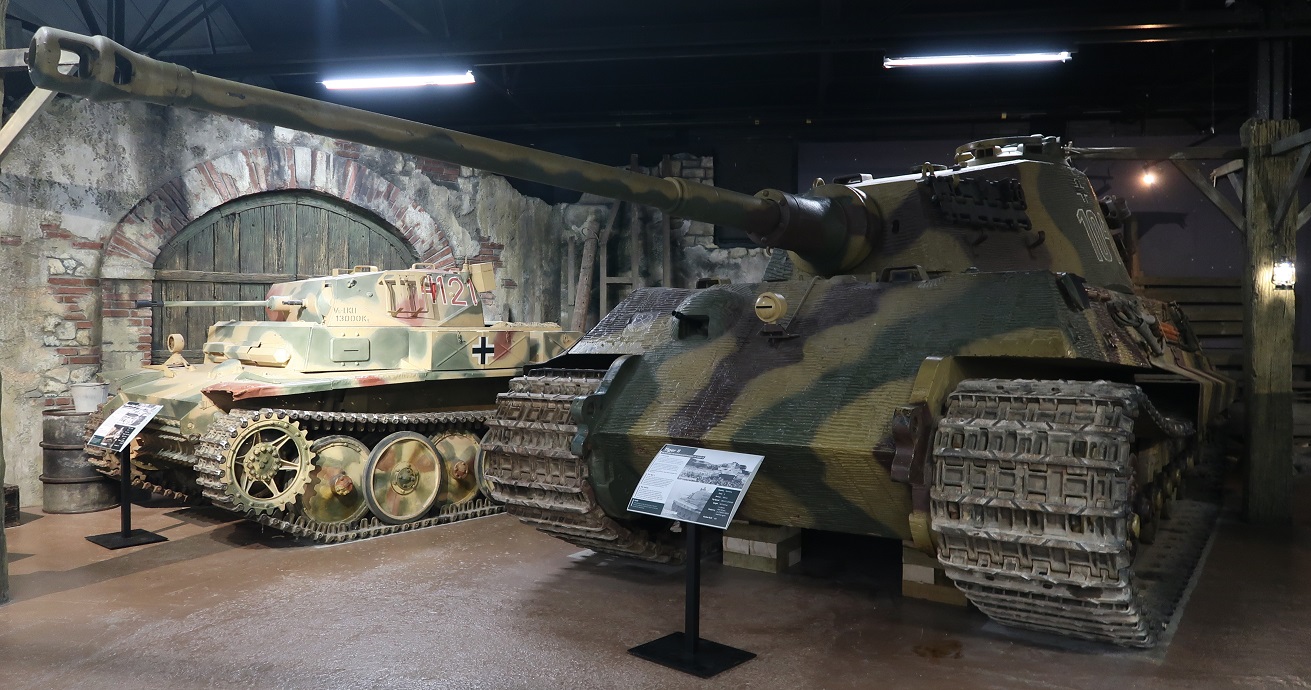


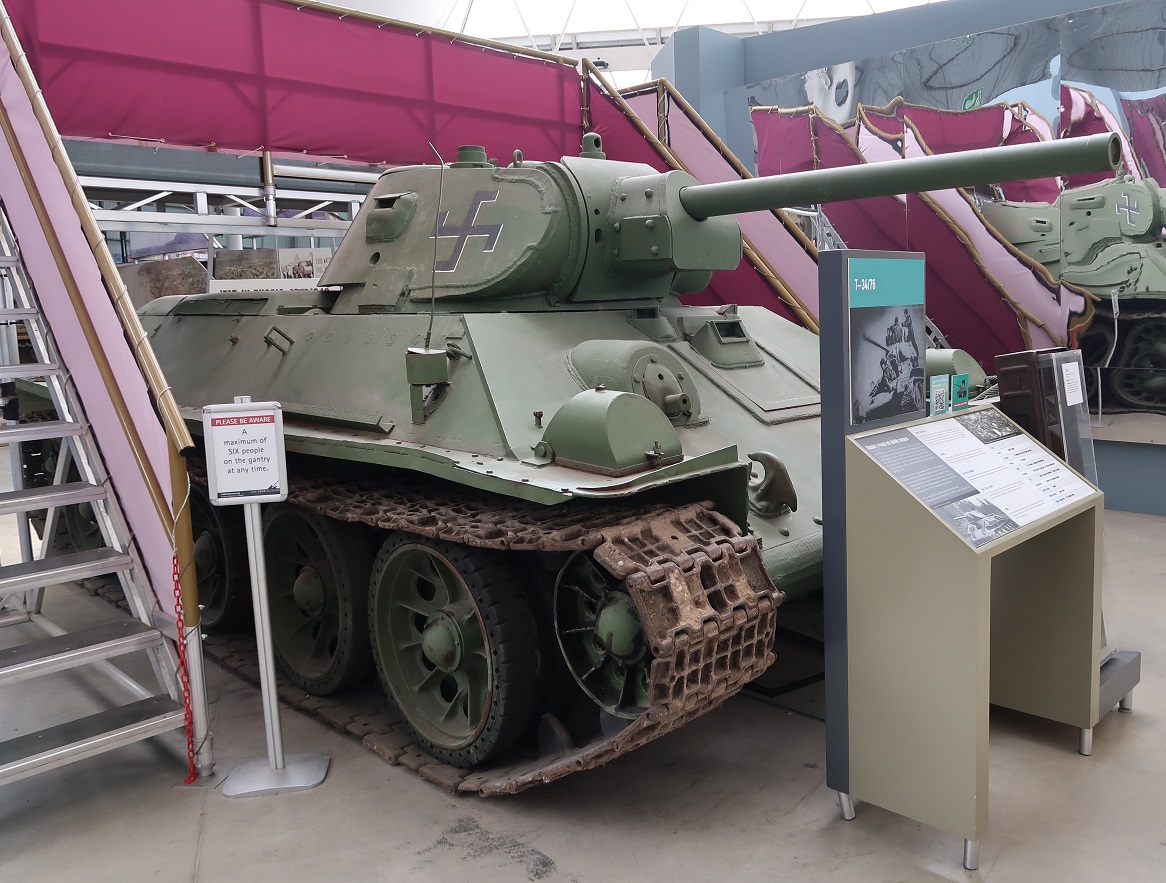


